Set up Validation
Kofax Transformation Modules - Validation is a custom module that you can add to the Kofax Capture workflow. Validation is typically placed just after a Server instance in the workflow.

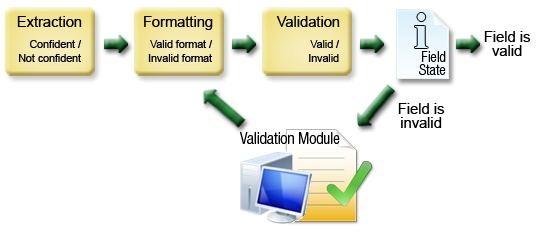
The preceding figure shows the general sequence of events that occur during the validation process. The input data comes from the automatic extraction step together with a confidence rating of either confident or not confident. Next, relevant field formatting rules are applied to the data. This formatting step may change the field text and return an attribute that indicates whether formatting succeeded or failed. The next step is the execution of relevant automatic validation rules. This step returns the final state for each field, indicating if it is valid or invalid.
Documents in which all fields are valid do not need to be shown in Validation, but documents with invalid fields are shown to a user to confirm or correct the invalid fields. After the correction and confirmation of the field data, the formatting and automatic validation rules are re-applied to all the modified fields. This cycle is repeated until all fields are valid. Adding validation to your project requires reviewing extraction settings, creating validation methods, adding/assigning validation rules, and defining validation forms.
Document validation ensures that all document fields contain valid data with respect to the actual user requirements. The validation process considers information from automatic extraction, the required field formatting settings, any available automatic validation rules, and input from the interactive user interface. The validation process consists mainly of two parts: the definition of the automatic validation rules and the definition of the interactive user interface. The interactive interface is also known as the Validation Form, which enables a user manually insert and correct document data.
After you define the validation methods and rules for the fields of a class, and create the validation form, you can test validation.
Define several validation steps if you need different users to validate a group of document fields while hiding information from a keyboard user. Define which document fields to display for a validation step and mask areas of a document in the viewer. Alternatively, use several validation steps to route a batch that contains internal invoices to a specific user.
Validation can run as multiple steps. Additional Validation steps are placed after the first Validation step. Each Validation step runs as an attended module and provides advanced validation functionality.
Repeat the following procedure for each class you configure for validation. Child classes inherit the validation form from their parent classes.
You can set up validation by following these steps:
- In the Project Tree, select a class from the class hierarchy.
-
In the
Details windows, edit the options for the defined fields.
Set validation thresholds for valid fields and enable the Require manual field confirmation option as needed.
-
Create validation methods.
- From the Project menu, select Project Settings to display the Project Settings window.
- Click the Validation tab.
- Click Add to display the New Validation Method window.
- Enter a name for the method and select the type of the validation method.
- Click OK to open the validation method properties window to set parameters.
- Click OK to save your settings and close the window.
-
Add single field or multi-field validation rules.
-
Select the class.
Classification and extraction for the class is required.
All the relevant extraction fields for that class are listed.
-
On the
Design tab, from the
Create group, click
Single Field Validation Rule, or click
Multi-field Validation Rule.
The validation rule is added to the class in the Project Tree, and the properties for that rule are displayed in the Details window.
- Configure your validation rule.
-
Select the class.
-
Define one ore more
validation forms.
- From the Project Tree, select the class.
-
On the
Design tab, in the
Validation Forms group, select
Customize. If the project is configured for more than one
Validation step, select
Step <n> from the submenu, where <n> is the number of the step with the validation
form to customize.
The Validation Form Layout window is displayed, showing the default validation form for the selected Validation step, and when applicable, of the selected class.
- Customize the form by adding or removing elements.
-
Define the required script events.
For example, if you add a button to the form, define the click events for the button. For details see Scripting Help or Customize a Validation Form.
-
Test the validation form.
- In the Documents window, select a document subset that contains the desired test documents.
- Select one or more documents.
-
On the
Processtab, in the
Extract submenu, click an option, or press F6.
Check the extraction results in the Extraction Results window.
Invalid fields have a blue question mark and valid fields have a green check mark.
-
On the
Process tab, click
Validate or use
F8.
If you use multiple validation steps, select a step from the submenu. If you press F8, select the validation step to test from the window that is displayed.
-
The validation form for the processed document shows the extracted values. Edit the fields as needed.
For example, test the extraction results, the validation rules, and error messages.
- Save the changes to your project.