Dock a window
If you have floated a window so it is a stand-alone window outside of the main Project Builder window, you can dock that window back to the Project Builder window.
You can choose to dock a window in one of the following positions:
-
Across the entire top of the Project Builder window
-
Fill the entire left side of the Project Builder window
-
Fill the entire right side of the Project Builder window
-
Across the entire bottom of the Project Builder window
-
Across the top of an existing window so the two windows share the existing space
-
On the left of an existing window so the two windows share the existing space
-
On the right of an existing window so the two windows share the existing space
-
Across the bottom of an existing window so the two windows share the existing space
-
Share the full space an existing window so the two windows are tabs using the same space
The following image shows the locations where a window can be docked:
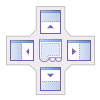
These positions are available for the main Project Builder window, or within an individual docked window. If you dock a window within another docked window, those two windows need to share the same space, so each automatically takes half of the available space. You can choose to resize one of these windows, or if space is at a premium, it may be better to put those windows into separate tabs.
If you do put your windows into tabs, ensure that none of the tabs need to be open at the same time as this can cause problems when trying to work on the two windows simultaneously.
You can dock a window by following these steps:
- Select the window to be docked and drag it over the Project Builder window keeping the mouse button held down.
-
With the mouse button held down, use the docking arrows to decide where to dock your window. When you are happy with
the docking position, release your mouse button.
When attempting to dock a window, the dragged window activates a map-like positioning system. Dragging the floating window to different areas within the Project Builder window highlights different areas where the window can be docked.
The stand-alone window is now docked within the Project Builder window at the selected location.
- Optionally, rearrange the other docked windows as desired.