Adjust line item table boundaries to determine on which invoice pages line item variations can be captured
Previously, it was only possible to capture line item variations on the first page of an invoice, but now, they can be captured from any invoice page. The pages on which line item variations can be captured is determined by the line item table boundaries. Use the following procedures to set the boundaries.
Only two line item boundaries can be drawn or adjusted on an invoice, one on the first page and one on one of the remaining pages where line items appear. The two must be connected in a continuous flow.
The page on which you draw the first boundary is the first page where Kofax ReadSoft Invoices looks for line items. It then also looks for line items on the following pages, if there are any, within the area defined by the second line item boundary drawn.
To adjust line item boundaries when optimizing line item tables or optimizing tax tables:
- In Optimize, click line items. Line item table boundaries are put in focus.
- Display the page of the invoice where line items start. Use the zoom buttons to show the entire page.
- If needed, adjust the sides of the line item boundary by right clicking within the area and selecting Move or Resize depending on what applies. Then drag boundaries where needed. For example, if miscellaneous information is found in a footer at the bottom of an invoice and Kofax ReadSoft Invoices has included it within the line item boundary, you can move the bottom edge of the boundary up to exclude that area.
- If line items continue on multiple pages, select one of the remaining pages on which they are found. Repeat step 2 where needed. For example, if Kofax ReadSoft Invoices has suggested the same area as the first page where line items are found, it may be necessary to increase the search area by moving the upper boundary upwards.
Drawing line item boundaries from scratch
It is possible to draw line item boundaries from scratch, but this should only be used in rare cases when the current settings cannot be used at all. To draw line item boundaries from scratch:
-
Click the Line item boundary button (
 ) if it is not already selected. Note that any previously
specified line item and line item field information will be lost.
-
Click and drag a frame around the area on the first page where
you expect to find line items. The line item field profiles you defined in
Manager appear in the
Line item learning
dialog.
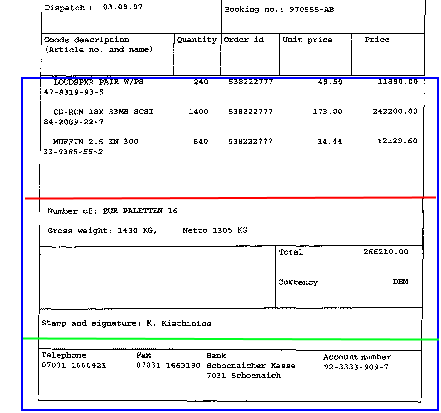
Draw the boundary starting just above the first line item. End it just below the last possible place on the page where line items may occur. Draw the sides of the boundary outside the area where line items can appear. Example:

In this example, the boundary at the bottom of the page may need to be moved up to the red line on the first page where line items appear, because that is about where the line items end on the page.
For the second set of table boundaries on subsequent pages, the bottom boundary may need to be left where it is to accommodate line items that go all the way to the bottom on some pages. Alternatively, if each subsequent page has a footer that contains other information as in the example above, the bottom boundary may need to be moved to the green line. In addition, the top boundary would probably need to be raised on subsequent pages to accommodate the additional space that would be used for line items on those pages.
- If a line item table appears on multiple invoice pages, repeat the steps above on only one of the other pages where line items are found. Which one does not matter. The boundary you specify here will apply to all remaining invoice pages.
For example, if a line item table has been specified on the five last pages of a seven-page invoice, such that line items start on page three and end on page seven, the first adjustable table boundary is found on page three. The second one is found on the remaining pages (that is, pages four through seven). If you happen to select the table boundary on page four and delete it, the table is deleted on both pages three and four, and the new line item table then starts on page five and ends on page seven. The first table boundary can then be adjusted on page five and the second on pages six or seven.
