Configure scan to folder
- In AutoStore, go to AutoStore Process Designer (APD). For details, see Welcome to AutoStore Process Designer.
- Select the Home tab and choose New.
- Define Task Properties and click OK on the Task Properties dialog.
- Click and drag the Unified Client icon from the Capture list located on left side of the AutoStore Process Designer Toolbox anywhere on the newly created workflow canvas on the right side of the screen to an AutoStore workflow to provide AutoStore capture functionality for Canon devices on which the Unified Client for Canon is installed.
- Scroll down to the bottom of the Route list and click and drag Send to Folder to the workflow.
- Right-click on the Unified Client icon and select Properties.
- Select the Preferences tab. Your settings under Server must match the ones you
specified in DRS. If you kept the default values there, type 3310 in the Web Server
Port field, and ensure that Use SSL is not selected. Otherwise, ensure that
these values match the ones you set in DRS.
Verify and ensure that no other AutoStore Capture components are using the same Web Server Port simultaneously.
- Go to the Groups tab, and click on Common Group for the Canon component configuration.
- Go to Add Form > Basic Form > select Canon from list of devices. Name the form 'Sample' and click on the Components tab to configure the folder to route the scan to.
- Select ... and add the path of the destination folder.
-
Click ... next to Folder path and create a folder such as
c:\Scans to send scans to. If Rename files
is not selected, then randomly generated file names are applied.
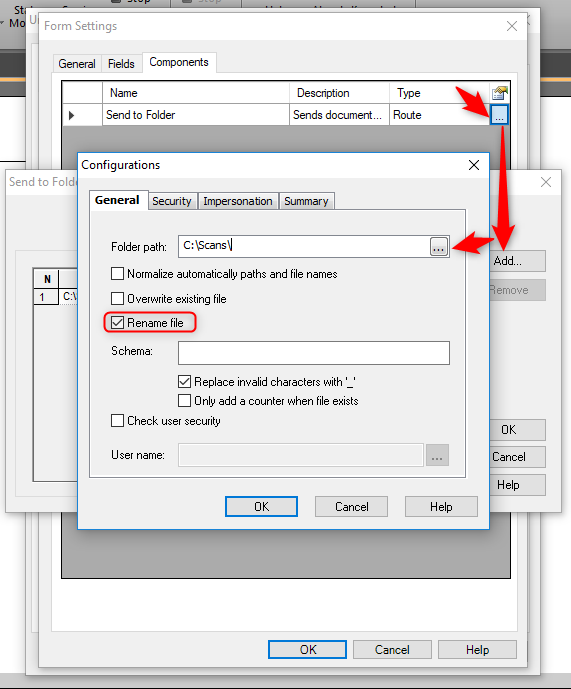
- Select Rename file to specify file names as you like. Refer to General tab for a detailed description of advanced renaming options.
-
To use a custom string as a lead-in followed by a counter plus the file extension,
enter the following Runtime Replacement Tags (RRT) into the Schema box:
YourCustomString_~STF::Counter~~STF::FileExt~
- Click OK. and Save to save the configuration to a folder such as c:\asconfigs.
- Click Start at the top of AutoStore Process Designer. You should now be able to start and use this workflow from the MFP.
AutoStore has a lot more AutoStore capture workflows to offer. Consult the downloaded product documentation on how to set those up.