Process Designer Utility
The Process Designer is a utility used by administrators to create and edit output processes. Output processes are used to modify document data while sending a document to a destination. Banners can be added, transforms can be processed, and various other changes made to the document record format.
The process designer is separated into three panels:
| Actions panel | This panel is a tree list of all actions that are available to build the process. The tree’s top level nodes represent groupings of similar type actions. Expanding a top level node reveals all the available actions for that group. |
| Process panel | This panel is where the process is built. An empty process will contain a start and end action image (which are not configurable and cannot be moved or deleted) with a link between representing the flow of the process. To build a process, you drag actions from the tree list and drop them on the link between two existing actions. |
| Action Configuration panel | This is where you configure an individual action. It is populated with all the parameters associated with the action that is currently (or most recently) selected in the Process panel. |
Output processes can either be associated with a destination or with a document. If associated with a destination, any document being sent to the respective destination goes through the process. If associated with the document, the process is executed no matter which destination the document goes to. The document’s process takes precedence over the destinations, unless the check box Override output process assigned to document is selected on the Destination's More settings tab. This is also where you would associate the output process with a destination. Output processes can be associated with documents through source configuration on the Output settings tab, business rules, or by assigning an output process profile from the Document right-click menu.
The Process Designer can be accessed by selecting from the Output Manager Console menu bar or from any area where output processes can be managed using the Manage Output Process Profiles dialog box.
Click the area of the window you want to learn more about.
Menu bar
The menu bar displays below the title bar.
| Menu | Command | Description |
|---|---|---|
| File | New | Starts a new output process in the Process Editor pane. |
| Open | Displays the Open Process dialog box for selecting the process you want to open. | |
| Save | Saves the current process. If you are modifying an existing output process, you will enter a process name and description. | |
| Save As | Saves the current process with a new name. You will enter a process name and description. | |
| Rename Process | Displays the Rename Process dialog box for renaming processes. | |
| Delete | Displays the Delete Process dialog box for selecting the processes you want to delete. | |
| Print Preview | Displays the contents of the Process Editor pane as it looks when printed. From the Print Preview window, you can specify the number of pages to view at a time, page through the document, zoom in and out of pages, and print. | |
| Prints the contents of the Process Editor pane. | ||
| Exit | Closes the Process Designer window. When you exit, you are prompted to save any changes. | |
| View | Zoom Canvas | Allows for setting the zoom level of the Process Editor pane. Displays the Process Designer Zoom dialog box. |
| Help | Help | Displays Help for the Process Designer window. |
| About | Displays program information, version number, and copyright. |
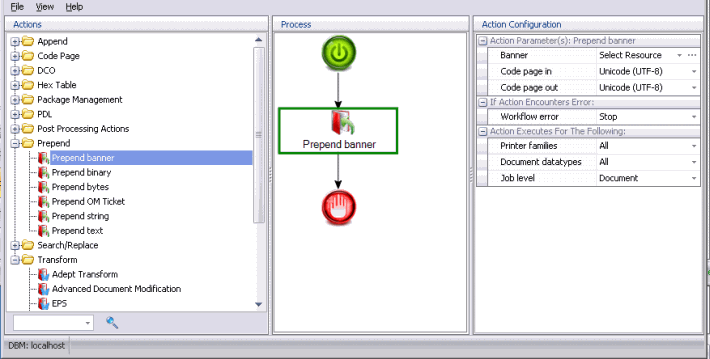
Actions panel
The Actions panel shows a tree view of all available actions. These actions are available for use in output processes. Click and drag actions from this panel to the Process panel. Actions can be configured as necessary after they are added to the Process panel.
The top-level folders in the Actions tree are used to group related actions. These folders cannot be moved or renamed.
Action types
The following table describes the Output Manager action types:
| Action type | Description |
|---|---|
| Append | Places data at the end of the document. The item being appended can be a set of bytes, a string, a text resource, a binary resource, or a banner resource. |
| Code Page | Changes the encoding of a document from one code page to another. |
| DCO | Allows for record format changes. |
| Hex Table | Allows single or multiple byte substitutions. |
| Package Management | Configures actions to define or manipulate package contents. |
| Post Processing Actions | Configures actions to be performed at the end of the output processing. |
| Prepend | Inserts data at the beginning of the document. The item being inserted can be a set of bytes, a string, a text resource, a binary resource, an Output Manager job ticket, or a banner resource. |
| Print Preferences | Modifies document properties and other document attributes to satisfy printer requirements for a specific document. |
| Search/Replace | Enables bytes and/or strings to be searched and then replaced. The item being replaced can be a set of bytes, a string, a text resource, a binary resource, or a banner resource. |
| Transform | Performs document transforms. The EPS and EPS Advanced actions are used for converting LCDS documents for use with an Xerox EPS controller. The Advanced Document Modification action allows repurposing of documents. |
For more details, see Output Process Actions.
Search box
A search box is provided in the Actions pane below the tree. To search, type the text you want to find in the box and press Enter or click the search button next to the box.

Process panel
The Process panel is where the output process is created. The Start and End images are initially displayed in this pane. You can click and drag actions into a process from the Actions tree. All you have to do is drag the actions on top of the line linking two actions. Because the placement and order of actions is important, the Process editor enforces where actions can be dropped using drop zones. When an action is placed on top of a line linking two actions, it can only be dropped if the line turns green. If the line remains black, the action is not accepted in that location. Actions can be reordered within the drop zone by dragging them to a new position.
Processes are built with a sequence of actions. Some actions must be performed in specific sequences when combined with other actions within the same process. Therefore landing zones are enforced within the Process panel. Actions are processed in zone order, and the Process editor will only allow new actions to be dropped into the proper zones. The following table lists the processing order dependency for actions.
Landing zones
| Number | Zone | Allowed actions or groups |
|---|---|---|
| 1 | Before processing a document | Prepend |
| 2a | Document conversions | Transforms and DCOs in any order |
| 2b | Document conversions | Search/Replace, Hex Table, and Code Page |
| 3 | After processing the document | Append |
| 4 | Currently not used | |
| 5 | Post processing | Email, Call Method, and Script |
There are five exceptions that will override the standard landing zone rules.
Landing zone exceptions
| Number | Exception |
|---|---|
| 1 | Transform, Transform with Banners, Adept Transform, and Advanced Document Modification actions are not allowed anywhere in the workflow after an Apply Print Preferences action. |
| 2 | None of the EPS type actions are permitted to be in the same output process workflow with an Apply Print Preferences action. |
| 3 | Merge, Set Document Properties, and Make Copies should always occur in that order. |
| 4 | If the Set Document Properties action passes all previous exception rules, it is allowed to be anywhere in the output process workflow. |
You can remove actions from an output process by selecting the action in the Process panel and pressing Delete. When an action is selected, a green box will display around the action.
Action Configuration panel
The Action Configuration panel allows for configuring the action selected in the Process panel. The configuration options that display vary depending an action. This panel is divided into the following three sections.
| Action Parameters | Configures the parameters of a selected action. These vary depending on the action it represents. |
| If Action Encounters Error | This is common to all actions. It contains a single parameter:
|
| Action Executes For The Following | This contains the following parameters:
|