Install the Equitrac server
In this document, file names are provided for both Equitrac Office and
Equitrac
Express. To set up the functionality described in this guide, you can choose to select
either - as long as you are consistent in your choice throughout the process.
Once you have verified that all prerequisites are met and all necessary downloads
are available, you can start deploying the package. Complete the following:
- Close all other applications on the server prior to running the Equitrac Office/Express installation.
- Unzip the downloaded EO5.7a.zip / EE5.7a.zip file.
- Select and run the Installer file (Equitrac.Office.exe / Equitrac.Express.exe) to launch the 64-bit Equitrac Office/Express Installation wizard.
- Read and accept the terms of the Kofax End User License Agreement, and click Install to continue.
- At the Welcome screen, click Next to begin the installation process.
- On the Select language screen, choose the interface language and select Standard Install.
-
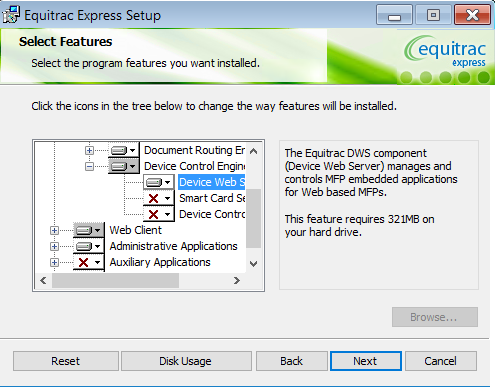
On the Select Features screen, expand Device
Control Engine (DCE) and select Device Web
Service (DWS) component and deselect other components.

- Expand Document Routing Engine (DRE) and select I-Queue component.
- (optional) Expand and select Scan Processing Engine (SPE) service.
- (optional) Expand and select Device Control Service (DCS) if you are to use Ethernet Card Readers.
- Click Next.
- On the Service Log On Credentials screen, enter the account and password for (SQL server: the admin/sa account) of the user who will run the Windows services. Alternatively, click Browse to search for valid user from a specific location. Click Test Credentials to verify the user, and click Next to continue.
- On the Windows Firewall Exceptions screen, select either a manual or automatic setup method for the firewall exceptions. Click Next.
- On the Database platform screen, proceed with default selection (SQL Server) and click Next.
- Select an available database server from the Database Instance list, and then click Next. Alternatively, you can type the database server address and the instance name in the Database Instance field.
-
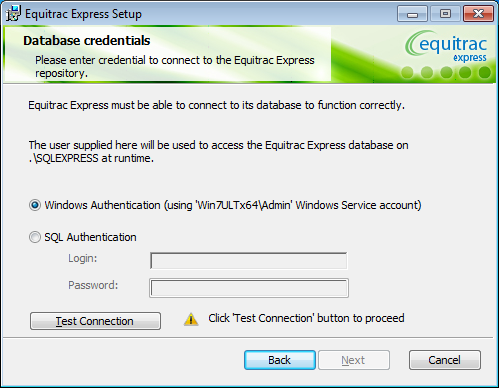
On the Database credentials screen, select the
authentication type of the selected SQL Server:
- Windows Authentication (default selection): select this option when the user running the Windows Service account connects to the database server. This user was specified on the Service Log On Credentials screen
- SQL Authentication: enter the user credentials in the Login and Password fields (this can be another Windows user or a SQL Server user)
-
Click Test Connection to check the connection to the
database with the selected user, then click Next.

- If the specified SQL Express database (“eqcas”) already exists (for example, in case of an upgrade), the Database Already Exists screen appears. Select whether to Replace or Keep the existing database, and click Next.
- If any of the Web Client features are selected for installation, the Web Client - Application Pool screens appears. Turn on the Application Pool and test it.
- On the Web Client - Single Sign-On screen, select the Single Sign-On feature and click Next.
- On the DCE High Availability Setup screen, do not select the DCE will be part of a High Availability setup check box. Click Next.
- On the DCE Local Cache Connection screen, create the Administrator account and Password to use with Distributed Cache, and click Next.
- On the Ready to install Equitrac Office/Express screen, click Install.
- Once installed, click Finish to exit the Equitrac Office/Express Installation wizard.
