Configure the import source settings for file
Integrate TotalAgility with a file import source to receive documents through files after you configure the import connection settings for emails. (See Configure the import connection settings for emails.)
-
On the
Home page, click
.
The Import Settings page appears.
-
Click
Add
 for
Import Connections.
for
Import Connections.
The Import Connection page appears.
-
Click
Add
for
Import Sources.
The Import Source page appears.
- On the Type list, select File.
- In the Display Name box, enter a unique name for the file.
- To activate the import connection, click Yes for Active.
- In the Poll Cycle in Seconds field, specify the number of seconds between the poll cycles when the import connector checks for new documents on the mail server.
- Navigate to the Watched folder.
- To import files from the immediate subfolders of the Watched folder, select Yes for Process Subfolders. The System scans only the first level of subfolders, deletes the subfolder as soon as the last file in it is imported, and ignores the files in the root of the Watched folder.
- To select or import files from the Watched folder directly, click Yes for Include Watched Folder.
- To create one document for each subfolder wherein each document is added as a page in the folder, click Yes for Import Files From Subfolder as Pages of a Single KTA Document.
- In the File Mask box, enter a comma-separated list of files to import from the folder. Use the asterisk as a wildcard to replace any number of characters. The question mark replaces a single character.
- Enter the name and password of the user with permission to modify the watched folder or have full control of the folder. By default, the local system user credentials are used by the Message Connector service.
-
To prevent importing only partially copied files, select either option:
-
File Not Modified Since: Enter the number of seconds. The import connector waits for the specified number of seconds after the file was last accessed before importing the file.
-
Use Trigger: Enables trigger file processing. A trigger file signals the import connector that the files or subfolders are ready for import. Configure the following settings:
-
Trigger File Mask: Indicates which files to import. Enter a comma-separated list of trigger files. Use the asterisk as a wildcard to replace any number of characters. The question mark replaces a single character.
The system only considers the existence of the file but ignores its content, that is the input file has the trigger file name but without the configured extension. For example, if the extension is TRG then trigger file file001.tif.trg is used to import the file file001.tif to the document repository.
-
Mode: Select one of the following:
-
Files in the same directory with the same base name: The trigger file imports all files in the directory with the same base name (except the trigger file itself). For example, a trigger file called Name.trg would import all files named Name regardless of the file extension in the watched folder.
-
All files in the same directory: The trigger file imports all files in the directory (except the trigger file itself) with a given file extension. For example, Testfile.jpg.trg imports all JPG files in the directory. The system creates locked TRG files if this type of naming convention is used with any other trigger type.
-
All files in the subfolder with the same base name: Imports all files in a subfolder with the same base name as the trigger file.
Note The trigger file must have an extension if you want to use this option. You can have any amount of subfolders within your watched folder. To use a subfolder, drop a trigger file into the watched folder with the name of the subfolder. All files of accepted file type will be processed in the subfolder. For example, to process files in the subfolder Folder A, you must have a file called Folder A.trg in your Watched folder.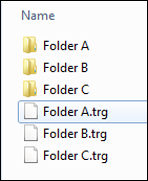
-
-
Trigger Options: Select either option:
-
Delete: Deletes the trigger file after import.
-
Rename Extension: Enter the new extension (string value) for trigger files that are already processed in the Rename Extension to box.
-
-
Import Trigger File: Select Yes to import the trigger file when other files are imported. By default, No is selected. This means that the content of the trigger file is not relevant and the file is deleted/renamed after the other documents are imported.
-
-
- Click Test File Import to test the import connector.
- Click Yes for Include Complete Message as EML File (default: No), to import an EML file same as the original email including attachments.
- Click Yes for Include Complete Message as MSG File (default: No), to import an MSG file same as the original email including attachments.
- In the Skip Import for Extensions field, enter a list of all the file types which you do not want to convert. Delimit each file type with a semicolon. For example, to skip the conversion of PNG and TEXT files, enter .png;.txt.
- In the Skip Import for Files of Size (bytes) Less Than field, enter a valid file size. TotalAgility skips the conversion of files with file size less than specified in this field. If you enter 0, this field is ignored.
- To allow the extraction of documents from PDF portfolio files, click Yes for Extract PDF Portfolio content. (Default: No).
-
Under
Documentation Normalization, configure the following settings:
-
To normalize non-PDF eDocuments (MS Office documents) to PDF/A, click
Yes for
Normalize non-PDF eDocuments to PDF/A and provide the following settings.
(Default: No)
- To skip converting certain file types to PDF/A format, enter the file types in the Skip PDF/A Preparation for Extensions box and separate each file type with a semicolon. For example, to skip the conversion of PNG and TEXT files, enter .png;.txt.
- To specify the minimum file size below which TotalAgility should skip conversion of files to PDF/A, enter a file size in the Skip PDF/A Preparation for Files of Size (bytes) Less Than box. To ignore this field, enter 0.
- To concatenate PDF files selected at the time of importing, click Yes for Concatenate Multiple PDF Files. (Default: No)
- To convert the PDF documents to the ISO-standardized PDF/A format, specialized for digital preservation of electronic documents, click Yes for Normalize Incoming PDF Documents to PDF/A. (Default: No).
-
To allow conversion of XFA forms to PDF documents, click
Yes for
Flatten XFA forms to PDF/A Documents Using Adobe LiveCycle. (Default:
No).
Ensure the following:
- Install the Adobe LiveCycle output service and ensure that the web service interface is available.
- Configure the Adobe LiveCycle credentials in the Kofax Message Connector configuration.
- If there is any exception during the normalization process of a document, you can import the unprocessed document. To import such unprocessed documents, select Yes for Import Exception Page for Failed Preparation (default: No). A document with error information is generated and the original document is appended to this document.
-
To normalize non-PDF eDocuments (MS Office documents) to PDF/A, click
Yes for
Normalize non-PDF eDocuments to PDF/A and provide the following settings.
(Default: No)
-
Under
VRS Processing, configure the following settings:
- In the Scan/VRS Profile box, consume a VRS profile from the VRS Profile box.
-
To extract the text from PDF, select one of the following options for
Extract Text From PDF:
- All Text(Default): Extracts both visible and invisible text.
- Visible Text Only: Extracts only visible texts.
- Automatic: Extracts only visible text. If results are empty, then extracts by including invisible text in the results.
- Ignore All Text Layer: Extracts PDF through OCR. PDF text layer is ignored.
-
In the
Word Separation Characters box, enter the characters that you need as
word separators. Default characters are:
"/",
":",
"(",
")",
"-" and
"#".
When processing the PDF text, strings of text containing these characters are treated as separate words. For example, "1234/56" is treated as three separate words, "1234", "/", and "56".
- To apply the selected VRS profile to the documents at the time of importing, click Yes for Apply Scan/VRS Profile to eDocuments. (Default: No)
-
To store the archived documents, under
Document Archiving, in the
Archive Folder box, enter the path to a local folder (such as, C:\Archive) or
a network folder. See
Kofax TotalAgility Administrator's Guide.
To test the archive folder, click Test Archive Folder.
-
To send notification emails to configured email addresses when the document import process is partially successful or
failed, under
Notification Settings, configure the following settings:
- In the Reject Notification Recipient List (delimited by “;”) field, enter email addresses to which you want to send the notification. Delimit each email addresses with a semicolon.
- To attach the original message (in eml format) to the notification mail, click Yes for Include Complete Email Message as Attachment. (Default: No)
- In the Message From field, enter the email address of the sender.
- To verify that all the emails settings are correct, click Send a Test Notification Email to send a test mail.
-
Under
XML Processing, select the import options for XML file:
To avoid parsing and mapping the content of an XML file and to import the XML file as binary content. Click Yes for Import XML as Binary Content To map the XML file fields to TotalAgility fields. -
Ensure that No is selected for Import XML as Binary Content (Default)
-
Select one of the following options for Kofax XML Import Mode:
- If you do not want to map the XML file fields to the TotalAgility fields, select the Do not map XML fields to KTA fields option.
- If you select Map XML fields to KTA fields and reject on mismatch option, TotalAgility import the XML file and map the TotalAgility fields to XML file fields. If there is any difference in the fields specified in the XML file, TotalAgility will reject the XML file.
- If you select Map XML fields to KTA fields and allow fields mismatch option, TotalAgility import the XML file and map the TotalAgility fields to XML file fields. If there is any difference in the fields specified in the XML file, TotalAgility will still import the file and display the errors in the Message Connector.
-
In Kofax XML Page Tag Processing Level, select either option.
-
To import a Kofax XML containing reference to a multi-page TIFF file, select Document .
-
To import Kofax XML containing reference to a single page TIFF file, ensure that Page is selected (default).
-
-
-
Select one of the following job types to associate an action with the File server so that a job can be created at
runtime:
-
Create New Job: Consume a process in the Process box.
-
Create New Case: Consume a case in the Case box and select one of the Expression Type from the following:
-
Regular Expression: Enter an expression to extract the case reference from a subject in the Case Reference box.
-
XSL : Enter an XML expression to extract the case reference from the XML data in the Case Reference box.
-
None: Automatically uses the job ID as the Case Reference.
-
-
Job In Case: Configure the Job In Case action similar to Create New Case action.
When you use a process with a document initialization variable, a new job is created for each document. However, when you use a process with a folder initialization variable, one job is created and the documents are added to the folder.
The Initialization Variables section lists initialization parameters for the map and document or folder variables.
-
-
In the
Mapping box, consume the metadata to map the email metadata to initialization
variables.
Note TotalAgility supports the Kofax Capture XML import file format. To access it within the TotalAgility process that is created through import, under Metadata, map the "XML DATA" field to one of the initialization variables of the process.
-
Click
OK. The Import Connection page appears.
At runtime, when the Ingest system task executes based on interval, and finds files, it extracts the corresponding data and creates the jobs/cases for them with all associated documents stored in the data layer. If the XML is provided (within the trigger file) to describe what images should be added to what documents, the correct documents are created.
Note the following:
-
If the process has a document initialization variable, a job is created for each document or subfolder and the document variable is updated with the Instance ID of the new document.
-
If the process has a folder initialization variable, one job is created and each document found is added to the folder; the folder variable is updated with the Instance ID of the newly created folder.
-
- Click OK for the changes to take effect.