Add a Drop-Down List to a table column
In a table with multiple rows, allow a user to change the content of a row using a drop-down list in the table column.
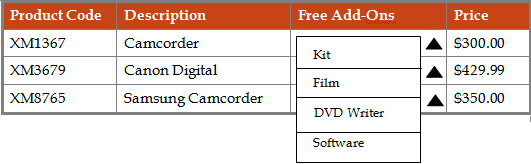
The following example shows a list of digital camera products. Each
digital camera has more than one free add-on associated with it. After the user
selects a camera, they can select the free add-on from the related drop-down
list.
To use a drop-down list, store the information in a previously defined database, .NET Method, or Web Service call.
For example, when creating a Staff Location Details table, enter the location details for each Staff member. Office location details appear in the Location table of the database. Map the Location column of the Staff Location Details table to the Location table of the database.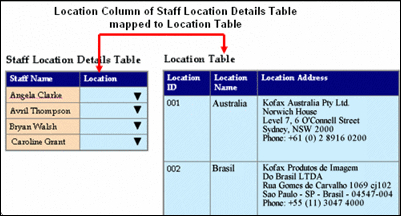
At runtime, when you add a row to the Staff Location Details table and enter location, the drop-down list is populated with the contents of the Location table. You can then select the location for a specific staff person.
For example, if Bryan Walsh works in the London office, select London from the Location list.

- On the Extended Properties page of a Table, click Columns.
- On the Data Type list, select String.
- On the Column Type list, select Drop-down.
- Click Configure.
-
To configure the drop-down control in a table, use either of the
following:
-
Dynamic: To use dynamic data in a drop-down list in a table column, create and consume a .NET Method, Web Service, or DB Query action.
-
Static: To use static data:
-
In the Prompt box, enter the value that appears on the drop-down list at runtime. For example, Please select.
-
Enter a Name and Value that appears on the drop-down list at runtime. For example, Please select.
-
Click Add
 .
.
The item is added to the list. Create as many items as required.
-
To make the item as default, on the list of items, click the Default button for the item. This item populates the field by default at runtime. For example, for a Title list, add the static items, such as Mr., Mrs., Miss, and select Mrs as the default.
-
To clear the default and reset it, click the Reset Defaults link, and set the default again.
-
To reorder the list, use the Up and Down buttons. By default, radio buttons appear in the order in which they are defined.
-
-
Lookups: To use predefined lookups, click Lookups and consume the lookup to use. See Manage lookups.
-
- Click Close.
- Click Save.