The eCopy Barcode Recognition Service
The eCopyBarcode Recognition Service is an eCopy service designed to enhance the scanning and image capture process. The service enables you to split files at barcodes and use the barcode data to rename the file. Also, if your business workflow demands it, the service can pass scanned files to document management systems and legal applications.
The ShareScan Administration Console enables you to configure and administer ShareScan managers, connectors, services, and scanning devices. ShareScan enables administrators to create profiles for the service and associate them with connector profiles. When a user at the device scans a document using a connector with an associated service, the document is scanned, processed by the service, and then passed to the connector workflow.
If you want to allow recognizing barcodes on multiple pages within one document, follow these steps:
- Configure Image Control to recognize the required barcode types.
- Set document splitting on the created page template(s).
- Configure the Quick Connect connector.
- Assign Image Control to the connector.
- Configure the Quick Connect connector with the new merging feature on the file naming tab; the connector concatenates the split pages.
- Define file naming for the Quick Connect connector.
- Select the Create single index file when Batching is enabled check box on the Index file tab of the Quick Connect connector.
- Configure the necessary index file format.
Improving barcode quality
In the eCopy environment, the print quality of the original document as well as the scanner settings can have a significant impact on the ability of the software to read barcode data.
ShareScan then passes control of the scanned document to the service, which extracts the barcode information. The service passes the barcode information to ShareScan, which uses the information to split the document and name each of the resulting files. The service does not alter the image; therefore, if the original document is of poor quality, or if the scanning quality is poor, the service's ability to recognize the scanned barcodes is less accurate.
eCopy suggests the following practices to increase the quality of scanned barcodes:
- Visually inspect the barcodes in the original document. Look for bars that are touching each other or that are full of dots. Use an image processing tool to zoom in on or to magnify the barcodes.
- Print barcode pages on a laser printer at a resolution of at least 600 dpi.
- Increase the resolution of your scanning device to 300 dpi, or higher.
- Use the eCopyImage Enhancement Service to improve the quality of the image. For more information about this service, contact Kofax.
Configuring batch-based indexing for Quick Connect
If you have eCopyQuick Connect, you can use batch-based index values. This enables you to create index files with separate barcode values for each batch by assigning a base name (Data publishing option in the Template settings window) to the position of the barcode.
All Publishing Names also have batch information available for eCopy Quick Connect™ to use.
Only the first value found per publishing name is published for the session.
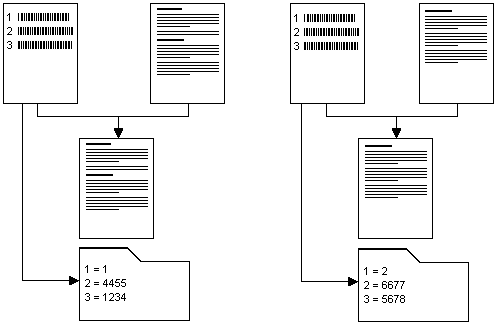
For example, a document is divided into two batches. It begins with a page that contains three barcodes and is split by another page that also contains three barcodes. On both pages the barcodes follow the same sequence but have different values:
Batch-based indexing example
|
Barcode Number |
Batch-based index value |
Index value, page 1 |
Index value, page 2 |
|---|---|---|---|
|
1 |
Document number |
1 |
2 |
|
2 |
Locator |
4455 |
6677 |
|
3 |
Extension |
1234 |
5678 |
The following diagram shows the four page document and how, after processing, the scanned document is stored with the correct index information.
When you configure a device and select this connector profile, you must then select the corresponding Document service profile that you set up in the Barcode Recognition Service (see Associating a service profile with a connector profile).
Data Publishing
Data publishing functionality is used for:
- Passing specific metadata information from the device and services and between eCopy connectors.
- Configuring to map fields within any service or connector which can use the information.
This includes Bates numbering, fields captured using a Document service and metadata, filename and file path information that can then be tied to similar metadata fields or applied to the body of text. Through using Document services or any other service or connector, information is “captured” and then categorized and mapped to fields in any connector, per document, real time, or asynchronously.
When a connector’s profile is configured for “No User Interface”, it would like to tell the ShareScan system and document sources about the data required to successfully send or store a document. A document source can use this information to ensure it sends required values and that data is formatted correctly (length, range, and so on). The ShareScan Administration Console uses this information to map published value names to those the connector’s profile looks for.
Indexing takes place before the document is split. The service calculates the barcode index number based on the sequential position of the barcode in the document. The first barcode has an index value of 1, the second has an index value of 2, and so on.
Indexing is done using the Data publishing option in the Template settings window. For more information, see Template settings.
Template settings
The Page Templates tab shows all the templates for your ShareScan Manager. The same template can be used by multiple profiles. You can move a template into the Active Page Templates list for use by the current profile. The purpose of this is to match the active templates to the scanned page based on their order in the active list.
Templates can be moved up and down to reorder the list. In general, the more restrictive or specific templates should be at the top of the list so they are matched before more general templates are tried.
Templates can also be removed from the Page Templates list. This deletes the template permanently and makes it unavailable to other profiles.
Page templates settings
|
Option |
Description |
|---|---|
|
New template |
Specifies the type of the full page template. The Barcode page dialog appears where you can specify the settings of the template. |
|
Edit template |
Modifies the settings of an existing template. The same dialog appears as in the previous case. It is initialized with the settings of the selected template. |
|
Remove template |
Allows deleting defined templates from the list. |
|
Move up and down |
Changes the order of active templates. The buttons have effect on the right side list only meaning that the client attempts to match the templates with pages in this order. |
Specifying the full page template settings
Select and open one of the templates in the editor with the Edit button or click the New button to bring the Template settings dialog for initial setup. The Template settings dialog displays the following options:
Template tab settings
|
Option |
Description |
|---|---|
|
Name |
Specifies the name of the template. You can refer to the template by this property. This value also defines the name of the template file where the definition is saved. |
|
Barcodes group |
Defines the barcode properties on the given pages. |
When you define a barcode based template the following controls have to be filled up:
|
Option |
Description |
|---|---|
|
Barcode recognition engine |
Select from the following available engines:
|
|
Barcode types |
Specifies the types of the barcodes. The types are not fully independent from each other. For example, if the UPC-A barcode type is selected, then the EAN-13 type is also selected automatically. If the EAN-13 type is deselected, then the UPC-A type is also deselected. This behavior comes from the limitation of the Aspose engine as it does not recognize UPC-A type if EAN-13 is turned off. The items check boxes allow multiple selections (all types supported by Aspose engine are listed). |
|
Orientation of barcodes |
Specifies the orientation of barcodes. The following options are available:
|
|
Data Publishing |
You can set as many data publishing keys (maximum is 10) as many barcodes are expected on the page. The associated list box supplied with in-place editing capability shows the defined keys; the toolbar buttons control adding, editing, and removing the keys and also changing their order. Renaming the keys is possible by clicking the selected item. |
Barcodes tab settings
| Group |
Setting |
Description |
|---|---|---|
|
Layout search order |
Layout search order defines the order in which multiple barcodes in the same zone are indexed. The options are as follows:
|
|
|
Barcode indexing |
Delimiter |
The delimiter character splits a barcode into multiple barcodes at each delimiter. This allows more than one piece of information to be published from one barcode. |
|
Barcode restrictions |
Always require checksum |
Set to always require checksum as barcodes can include a checksum to help validate the value. In this case, barcodes without a checksum are ignored. |
|
Length |
Minimum and maximum length setting filters out bad matches. Select the following values to:
|
Global Barcode settings defined on the Barcodes tab apply to all barcode zones.
Understanding document splitting
You can set up page handling rules for all the active templates in the Document Splitting tab.
Document splitting display
|
Option |
Description |
|---|---|
|
Template |
When a template matches a page, its rules are applied. Only one template is used per page (the first template in the list that matches). |
|
Barcode page removal |
ShareScan has a feature for page removal in a special case when the double-sided paper documents in a job are separated by full page barcode pages. Typically, the backside of the barcode page is blank and does not belong to the original document. This blank page has to be dropped from the batch if double-sided scanning job runs on the client. The Document Splitting tab on the main panel contains the list of the defined templates. The Barcode page removal column provides three options if the selected template is a barcode page:
The client workflow has to change accordingly. To apply the option to a batch, the connector checks if a double-sided scan job runs (see IPublishing.DoubleSided bool value). The blank page detection algorithm is applied to the page next to the barcode page and it is removed only if the page is really blank as it prevents from data loss. |
|
Split at page |
The document can be split into multiple documents at this page. |
|
Split by value |
This column indicates the regular expression that the recognized value of the barcode has to match. This value is not set by default when you create the data publishing field. If the value is not set, the document splitting is performed on pages matching with the template independently from the actual value of the barcode. |
|
Override default file naming |
The split document can be named according to the current ShareScan file naming settings, or they can be overridden here. The format of the filename is displayed and can be clicked to bring up the file naming dialog (see File naming). |
File naming
On the Document splitting tab, if split on page is checked and override default file naming is checked, the file format string becomes a clickable link, which opens the File Name Dialog (FileNameDlg) window.
|
Option |
Description |
|---|---|
|
Name/Type/Length/Default |
By clicking these settings, the >File name field editor dialog window appears. |
|
Format |
Construct a name format out of multiple name fields. The <yyyyMMdd> value is default. Fields can be created, edited, removed, and reordered. |
|
Preview |
A preview is displayed. |
|
If file name already exists |
Create unique file name, for example _1, _2, and so on. All file name conflicts at runtime are resolved by appending a number to the end until it becomes unique. |
Clicking New or Edit brings up the File Name Filed Editor dialog.
File name field editor settings
|
Option |
Description |
|---|---|
|
Name |
Displays a name. |
|
Type |
You can pick from a list of predefined field types plus each of the published data fields they have defined for this template. Each Field type has different parameters:
|