Using connectors
Below, you can find a typical workflow, which provides an overview on how the connectors work. Depending on the connector, minor details may vary.
At the scanning device, the user follows the standard eCopy workflow to scan and send a document. If you configure a connector profile to use the Express function, users will not need to perform many of the steps included in the procedure in this section.
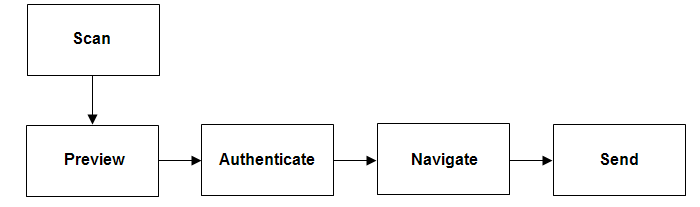
Scan
- Place your document in the feeder or on the glass.
- If your system is configured to use the Session Logon feature, enter your user credentials on the Login screen and then press Login. If your Session login credentials are not valid, the Login screen for the connector will appear after you preview the scanned document.If Search while typing is enabled on the Session login tab, ShareScan will search for matching address list entries after each character you enter in the User name field. Select your name from the list that appears as you enter each character. If Search while typing is disabled on the Device services tab, it overrides this setting. However, even when Search while typing is disabled, you can still perform a search by entering characters and pressing the Search icon. When you have successfully logged in, the Home screen appears.
- Review the default scanner settings in the left pane; use the down arrow button to view additional scanner options. To change a setting, select the option, such as “Paper size,” and then select the setting on the toolbar that appears. ShareScan will use the modified scanner settings for all subsequent pages that you scan during this session, unless you change settings from the Preview screen.
- Press the connector button.
Preview
- When the connector finishes scanning the document, review the scanned images.
The buttons on the Preview screen enable you to view, delete, rotate, and
change the magnification of the images.
The following rotation options are available under the Rotate menu item:
- Rotate clockwise
- Rotate counter-clockwise
- Rotate all clockwise
- Rotate all counter-clockwise
If Image Control service is configured for the workflow, rotation time for the Rotate all clockwise and Rotate all counter-clockwise options increases considerably on multiple vendor devices before the user can proceed to the next workflow step.
- If necessary, scan additional pages or re-scan any of the original pages by placing the pages in the feeder, or on the glass, and then pressing the Scan more button.When you scan additional pages, the client inserts them after the page that is currently displayed on the Preview screen. For example, if the client is displaying page 5 of an 8-page document and you scan two more pages, the client inserts the new pages after page 5.
- To review and change the scanner settings, press the Scanner settings button on the Preview screen. The Scanner settings... screen appears. After changing the scanner settings, select OK.
- To review and change the document settings, select the Document settings button on the Preview screen. After changing the document settings, press OK.
- When you are ready to send or store the document, press Next.
Authenticate and Navigate
- If the Logon screen appears after you preview the document, enter your user credentials, then press Next.
- If you configure the connector to allow navigation, the Folder navigation screen appears. The list can display 200 entries at one time.
- Select the target subfolder in the destination folder.
- Select sub-levels in the list until the complete path appears in the Path field at the top of the screen.
- When you have selected the destination, press Next.
Send
- If the Send screen appears, specify the settings
- Press Next.
- Select one of the post-scanning options.