Add Workflows to the Xerox All Services screen
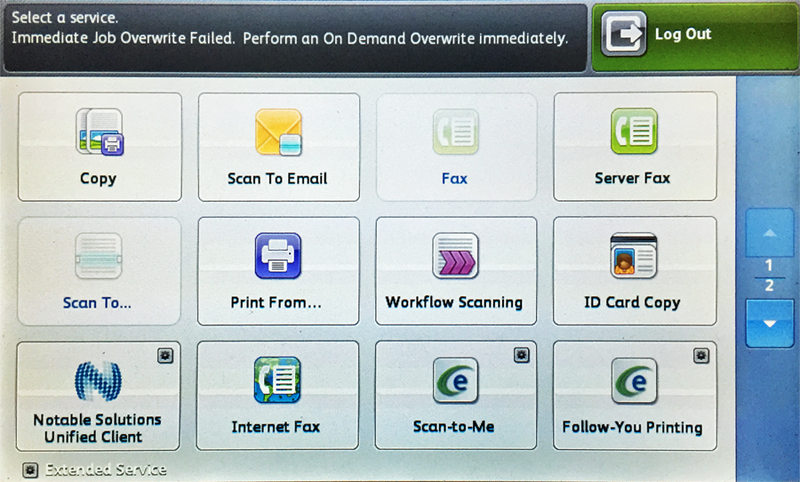
Typically, users must select the Equitrac Launcher to access Equitrac functions on the MFP. You can, however, configure Equitrac to automatically provide options for Equitrac-specific Workflows on the Services Home screen alongside the native options for the device. For example, as in the image below, you can configure a device to display options for Scan-To-Me and Follow-You Printing to authorized users as two individual buttons in the Services Home screen. Each button opens its respective Workflow in Equitrac.
The caption for any particular Equitrac
Workflow on the Services Home screen is sourced from the name given to the Workflow.
If you want to designate a particular caption for a Workflow, change its Name under
Workflow Management. In order for name changes to take effect, the device must be
reinitialized.
-
Create Workflows.
There must be one Workflow for each button that displays on the Services Home screen. There are two options for creating workflows:
- Equitrac ships with many commonly used Workflows that you can select without further configuration. If you want to use these pre-configured Workflows, proceed to step 2.
- In Web System Manager, go to to customize your own Workflow(s). Follow the instructions under Configuring Workflows in the Kofax Equitrac Administration Help file.
-
Create a custom Workflow Container.
- In Web System Manager, go to .
-
Click Add to open the Add Workflow Container
dialog box:
- In the field, give your new Workflow Container a name.
- Select from the list.
- Ensure the check box is selected.
-
Click the ">" button next to the Workflows and Containers in the
Available workflows and containers list that you want to include on the
Services Home screen. Each item moved to the Added workflows and
containers list will have its own icon on the Services Home
screen.
If you select a Container, then the Container appears on the Services Home screen. Selecting the corresponding icon from the Services Home screen then opens a list of the Workflows therein.Any Workflows or Containers that you add to a custom Workflow Container must also reside in the Launcher Container to display on the Services Home screen, with the exception of the Launcher itself. If the chosen Workflows and/or Containers are not in the Launcher Container, the workflow icons appear, but they open the Launcher rather than the expected workflow. As a result, the user will need to go through the Launcher option, instead of using these specifically-selected workflows and containers.
-
Optionally, to automatically start a configured Equitrac Workflow when a user
logs on, select the respective function’s Default check
box. When selected, the device unlocks the MFP and automatically proceeds to
that Workflow. There can only be one default Workflow per Container.
If your default Workflow requires Billing Codes to be entered, the user first enters the appropriate Billing Code before proceeding to the Workflow. To enable native MFP applications to charge against the Billing Code, a default workflow requiring the entry of a Billing Code must be designated.
-
Configure a default Container.
By default, no Equitrac Workflow(s) are configured to display on the Services Home screen. Rather the Services Home screen displays the option to select the Launcher.To select a default Workflow Container with the Workflows you want to display, do the following.Selecting a Workflow Container in this manner sets it as a global default, affecting all subsequently added devices as configured in this step.
- In Web System Manger, go to and select from the Device type list.
- From the Services Home Container list, select the Workflow Container you want to use as the global default for all devices. This list contains the pre-configured and created Workflow Containers.
-
Associate the Workflow Container with a device:
- In Web System Manager, go to to see the list of added devices.
-
Select the physical device and then select Add Embedded Device from the
Select Action list. The Embedded device
dialog box displays. The default settings created in step 4 are
pre-populated in this dialog; any changes made here supersede these
settings:
It is possible to modify the settings of multiple devices at the same time by Control-clicking each device and then opening the Embedded device dialog. The changes made in this dialog then apply to all selected devices.
- From the All Services Workflow Folder list, select the new container that you created in step 4 above, if not already selected.
-
Click . This programs the device(s) to display the buttons for each
Workflow.
You must Initialize the device each time you make changes to this dialog in order for the changes to take effect. Clicking OK will save the changes, but not initiate them for use by the device.
- Click OK.