Quick Setup Process for AutoStore
Follow these steps to perform an installation of Samsung Smart UX for an AutoStore only environment:
All steps outlined are performed from the server where the
installation takes place. Administrative access to the server is required.
-
Install Device Registration Service (DRS).
-
Download the DRS 7.10 software zip file from the Web License Portal.
Caution:Ensure you download DRS version 7.10 or later.
-
Once the archive downloads, extract it. The archive creates a new DRS
7.10 folder containing the following files:
- DeviceRegistrationService.zip
- DRS 7.10 Release Notes.htm
- DRS 7.10 User and Client Guide
- Equitrac_Third_Party-Readme.pdf
- Unzip the DeviceRegistrationService.zip. This creates a new folder containing the DeviceRegistrationService.exe.
- Run the DeviceRegistrationService.exe file, and follow the instructions to install DRS. For specific instructions, see the DRS 7.10 User and Client Guide included in your download archive.
-
Download the DRS 7.10 software zip file from the Web License Portal.
-
Install Samsung Smart UX.
- Download the most recent version of Samsung Smart UX from the Web License Portal.
- Once the archive downloads, extract SmartUXServices<build-number>.zip. The archive contains the SamsungSmartUX-prod.apk and SmartUXServices.apk files.
-
Upload the Samsung Smart UX client and server package files to DRS:
-
Open a web browser and enter http://DRSServerIP:9000/device where
DRSServerIP is the IP address of the server where you installed DRS. The
Kofax Device Registration Service screen
opens:
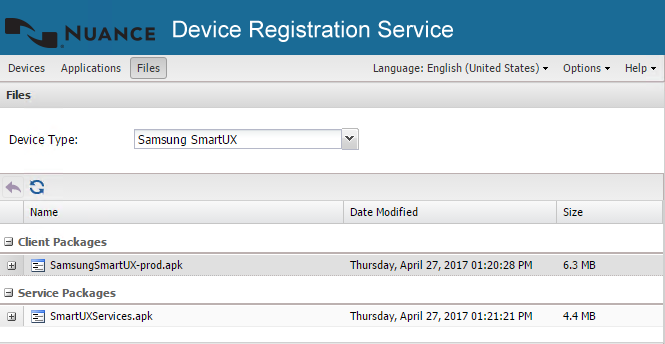
- Select the Files tab.
- From the Device Type drop-down list, select Samsung SmartUX.
- At the bottom of the screen, click the Upload button. This opens a file explorer, where you can navigate to the SamsungSmartUX-prod.apk and SmartUXServices.apk files and upload these files.
-
Open a web browser and enter http://DRSServerIP:9000/device where
DRSServerIP is the IP address of the server where you installed DRS. The
Kofax Device Registration Service screen
opens:
-
Create the application in DRS:
-
Select the Applications tab.
-
Click the green (
 ) button at the top of the left
Applications pane. The Add
Application function loads into the right pane.
) button at the top of the left
Applications pane. The Add
Application function loads into the right pane.
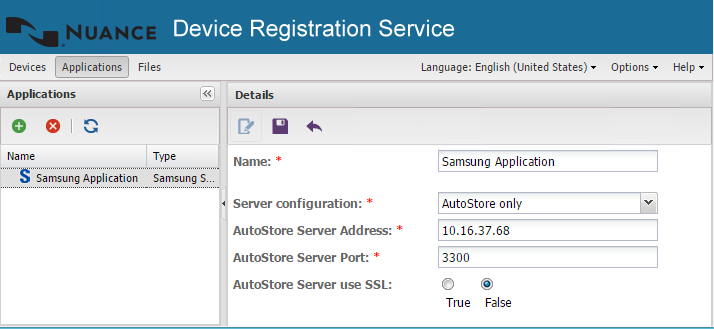
- In the Name field (required), enter a name for the application. You can use any name you like; for this example, Samsung Smart UX was used.
- In the Application Type field (required), select Samsung SmartUX.
- From the Server configuration drop-down list, select AutoStore only.
- In the AutoStore Server Address field (required), enter the IP address used by the AutoStore Server.
- In the AutoStore Server Port field, enter the server port used by the AutoStore Server.
- In the AutoStore Server use SSL field, select True or False (it should match what is on the Preferences tab of the Samsung Smart UX component).
-
Click the Save button (
 ) at the top
of the Add Application screen.
) at the top
of the Add Application screen.
-
Select the Applications tab.
-
Add a device in DRS:
-
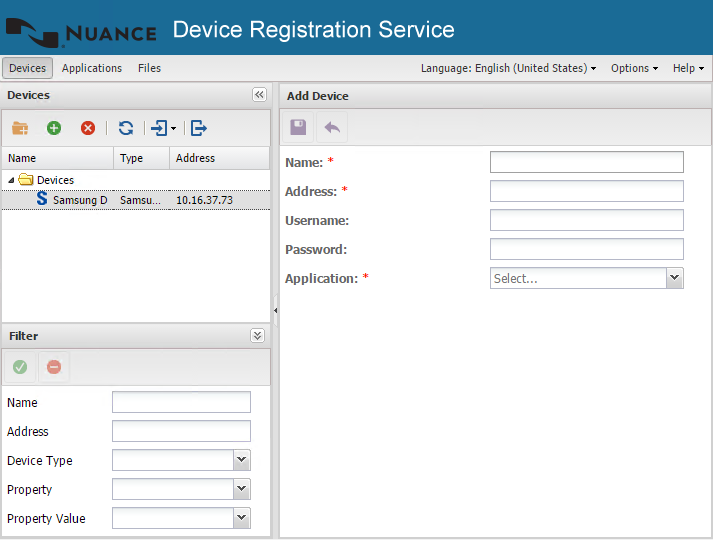
Select the Devices tab.
-
Click the green () button at the top of the left Devices pane.
The Add Device function loads into the right
pane.
- In the Name field (required), enter a name for the Samsung Smart UX device or device group that identifies it on the network.
- In the Address field (required), enter the IP address of the device.
- Enter the Username and Password for the device. By default, the username is admin and the password is left blank.
- From the Application drop-down list (required), select the application you created. In this example, Samsung Smart UX. The rest of the Add Device fields appear below.
- In the Device use SSL field, select True or False (Device use SSL should match SSL settings on a device).
- In the Client Package field (required), select SamsungSmartUX-prod.apk - Kofax Unified Client for Samsung Smart UX <build-number> from a list of uploaded packages.
- In the Server Package field (required), select SmartUXServices.apk - Smart UX License Management <version-number> from a list of uploaded packages.
-
Click the Save () button at
the top of the Add Device pane.
-
Select the Devices tab.
-
Execute final actions. Once you save the Device, a new Select
Action... drop-down list displays at the top of the Devices
pane. The following actions are available:
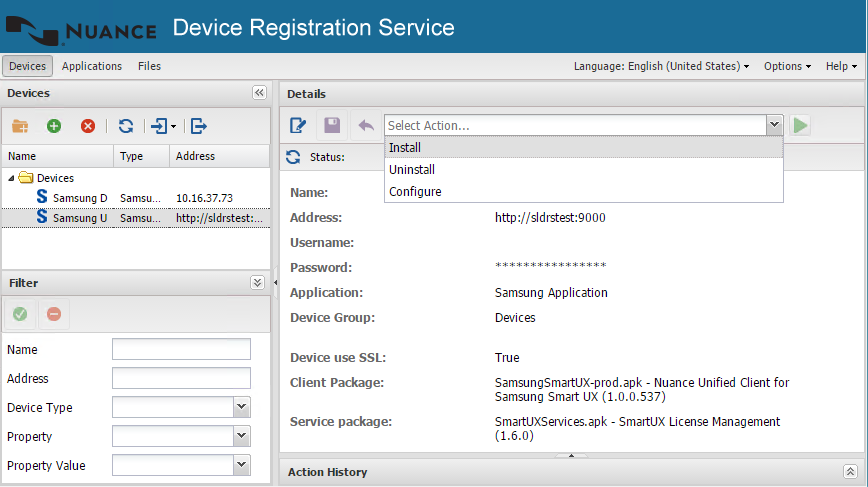
- To install, select Install and click the
Run Action icon (
 ) to
run the action. This may take a few moments to complete; once
finished, a Successfully completed message
appears in the Action History pane at the
bottom of the screen.
) to
run the action. This may take a few moments to complete; once
finished, a Successfully completed message
appears in the Action History pane at the
bottom of the screen. - To uninstall, select Uninstall and click the
Run Action icon () to
run the action. This may take a few moments to complete; once
finished, a Successfully completed message
appears in the Action History pane at the
bottom of the screen.
- To configure, select Configure and click the
Run Action icon () to
run the action. This may take a few moments to complete; once
finished, a Successfully completed message
appears in the Action History pane at the
bottom of the screen.
- To install, select Install and click the
Run Action icon (
- Add and configure Samsung Smart UX component to an AutoStore workflow. For more information, see Device Registration Service User Guide and AutoStore Administration Guide.