Import a package
You can import entire package or the selected items to TotalAgility. The details of the item, such as item name, artifact, version, and last modified date are also displayed.
For recommended approach to automated import of packages, see
Automated export and import of packages
in
Kofax TotalAgility
Best Practices Guide.
You can import all items within a package, or import selected items from the package, or import individual items from each group (Artifact) in the package. The items in a package belong to the following groups:
-
All
-
Capture
-
Devices
-
Export connector
-
Integration
-
Monitoring
-
Packages
-
Queries
-
Resources
-
System
-
System data
-
User interface
-
Workflow
You can additionally include items based on the selected deployment configuration. During import, you can overwrite the values of items based on the selected deployment type.
-
If a deployment is not selected when importing the package, the package will have the deployments defined in the package while the values for global variables, server variables, web services, device settings and export connector settings are not overwritten.
-
If a deployment is not selected when importing selected items, the base values of the items are imported.
-
If a deployment is selected when importing the package, the package will have all the deployments defined along with the values overridden for the selected deployment type.
When importing a package with a deployment type, the values for existing transformation settings are not overwritten but only additional transformation settings are added to the artefact list.
-
If a deployment is selected when importing selected items, only the values for the selected items are overridden with the values of selected deployment type. The values for the transformation settings are not overridden.
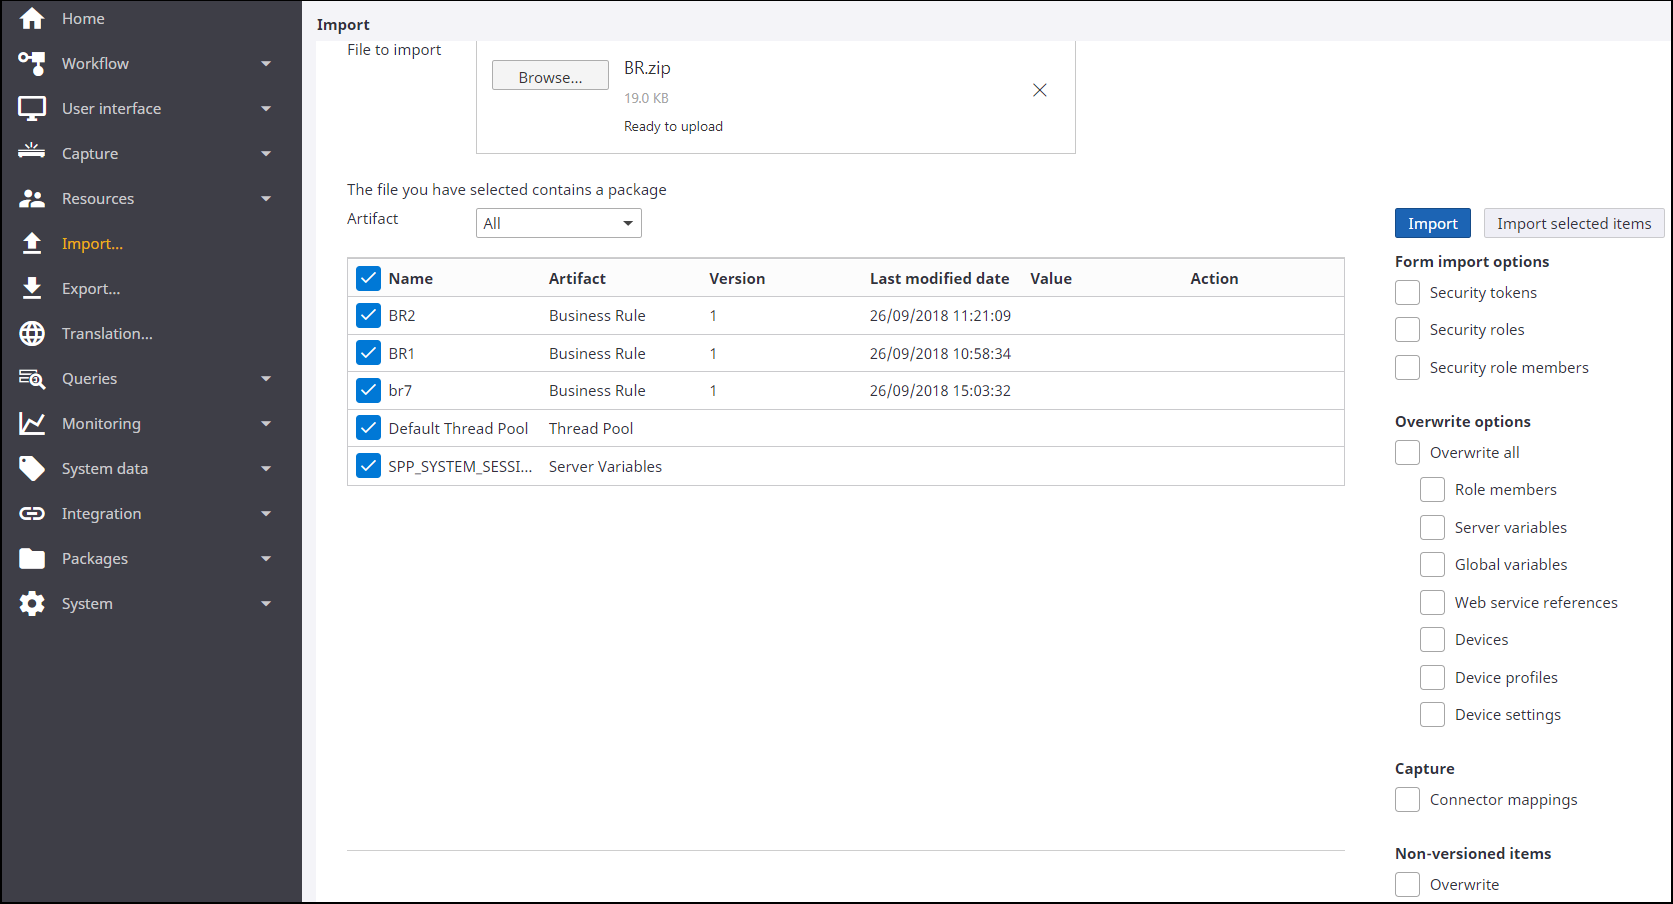
- Navigate to Import.
-
Click
Browse and select the
package zip file to import, or drag the zip file to the
File to import field.
All the artifacts from the selected package are displayed. By default, all the items including the global variables, server variables, web service references, device settings, and export connector mappings are selected regardless of the groups in the package. However, you can filter the items to display from a specific group. For example, to view only items from a process, on the Artifact list, select Process.
-
In the
Form import options group,
include or exclude the following import options (Default: Clear):
-
Security tokens
-
Security roles
-
Security role members
-
-
You can choose to overwrite the values for individual items (Role
members, Server variables, Global variables, Web service references, Devices,
Device profiles and the Device settings) or all items. To overwrite the values
for individual items, see Steps 5, 6, 7, and 8. To overwrite the values of all
items at one go, do the following:
-
In the
Overwrite options
group, select
Overwrite all.
(Default: Clear)
Automatically, all the items are selected.
-
In the Artifacts table, under
Action column, click
Update for each item,
modify the
Value as needed and
click
Update.
The values for the items that were defined when adding the deployment configuration to the package, are overwritten.
-
In the
Overwrite options
group, select
Overwrite all.
(Default: Clear)
-
To overwrite the value of a global or server variable on the
existing target system, do the following:
- In the Overwrite options group, select Global variables or Server variables. (Default: Clear)
-
In the Artifacts table, under
Action column, click
Update for the
variable, modify the
Value as needed and
click
Update.
Note You cannot update the Complex and XML Expression variables. If the global variable/ server variable does not exist on the target system, the variable is added to the system with the provided value regardless of the overwrite setting for variable.
-
To overwrite the value of a web service reference on the existing
target system, do the following:
- In the Overwrite options group, select Web service references. (Default: Clear)
- In the Artifacts table, under Action column, click Update.
-
Change the value of
URL,
Endpoint URL, and
User credentials
(Username and
Password) as needed
and click
Update.
Note If the web service reference does not exist on the target system, the web service reference is added to the system with the provided value regardless of the overwrite setting for web service reference.
-
To overwrite the value of a device setting on the target system,
in the
Overwrite options group,
do the following:
- To overwrite and import data of all the devices, select Devices. (Default: Clear. This means, only the devices that do not exist on the target system are imported.)
- To overwrite and import profiles data of all the devices, select Device profiles. (Default: Clear. This means, only the device profiles that do not exist on the target system are imported.)
- To overwrite and import the settings of all the devices, select Device settings. (Default: Clear. This means, only the custom advanced settings that do not exist on the target system are imported.)
- In the Artifacts table, under Action column, click Update for the setting to modify.
- Ensure that the IsOverridable check box is selected so that the setting is overridden.
-
Change the
Value, and click
Update.
For the device settings, such as webdav.trust.all.certificates, you can upload the certificate.
- Update the value for other device settings as required.
The values of the device settings that were defined when adding the deployment configuration to the package, are overwritten.
Note If the device setting does not exist on the target system, the device setting is added to the system with the provided value regardless of the overwrite settings. -
To overwrite the value of an export connector setting, in the
Capture group, do the
following:
- Select Connector mappings. (Default: Clear)
- In the Artifacts table, under Action column, click Update for the connector mapping to update.
- Change the Value as needed.
- Select the Override check box.
- To update the same value for all the instances of the setting with the same connector type and property, select the Update {Property} for all instances with the same value check box.
- Click Update.
- Update the value for other connector mappings as required.
The values of the export connector settings that were defined when adding the deployment configuration to the package, are overwritten.
-
In the
Non-versioned items group,
select
Overwrite to overwrite
the non-versioned items that already exist on the target system (default: No)
with the items contained in the package. The non-versioned items that can be
overwritten include: Checklist, Lookups, Scan/VRS profiles, PDF profiles,
Separation profiles, Note types, Hotkeys, Work types, Work allocation rules,
Events, Targets, Alerts, Themes, Navigations, Sites, Miscellaneous files,
Document templates, .Net references, Stylesheets, Images, Custom pages,
Localization strings, Job query, Work queue query, System query, Personas, Page
renditions, Node colors, Formatters and Reporting tags.
Note If you select to overwrite the non-versioned items, the existing rendition settings are overwritten by the settings included in the package. For example, if the target machine has Rendition 1 and Rendition 2 and the package has Rendition A and Rendition B, Rendition A and Rendition B are retained in the target machine. Otherwise, Rendition 1 and Rendition 2 are retained in the target machine.
-
Select either option:
-
To import the entire package, click
Import.
The import summary is displayed with any error or warning messages.
- To import selected items from the package, do either of the following:
-
On the list of All items, clear the check boxes for the items to exclude and click Import selected items.
-
To import selected items from a specific group, on the Artifact list, select the artifact, such as Process, clear the check boxes for the items to exclude and then click Import selected items.
The import summary is displayed with any error or warning messages.
Note-
The entire package is only imported if its version is greater than the package version existing on the target system.
-
When importing selecting items from a package, and if the package contains a sub package, only the items selected from the main package and sub package are imported.
-
When importing a package, if the process version is same as the version that exists on the target system, the package is not imported. For example, if version 3 of a process within a package already exists in the target system.
-
If you select to import the entire package, all the items in the package are imported even if you choose to exclude few items from importing.
-
The Resource extensions are saved to the System settings. If the target system already has extensions, imported ones are added.
-
If the package includes the resource group members, only the resources that do not exist on the target system are imported.
-
If the package includes the hotkeys, you must restart the IIS Application Pool for the hotkeys to work at runtime.
-
To import the entire package, click
Import.