The search returns topics that contain terms you enter. If you type more than one term, an OR is assumed, which returns topics where any of the terms are found.
The search also uses fuzzy matching to account for partial words (such as install and installs). The results appear in order of relevance, based on how many search terms occur per topic. Exact matches are highlighted.
To refine the search, you can use the following operators:
Type + in front of words that must be included in the search or - in front of words to exclude. (Example: user +shortcut –group finds shortcut and user shortcut, but not group or user group.)
Use * as a wildcard for missing characters. The wildcard can be used anywhere in a search term. (Example: inst* finds installation and instructions.)
Type title: at the beginning of the search phrase to look only for topic titles. (Example: title:configuration finds the topic titled “Changing the software configuration.”)
For multi-term searches, you can specify a priority for terms in your search. Follow the term with ^ and a positive number that indicates the weight given that term. A higher number indicates more weight. (Example: shortcut^10 group gives shortcut 10 times the weight as group.)
To use fuzzy searching to account for misspellings, follow the term with ~ and a positive number for the number of corrections to be made. (Example: port~1 matches fort, post, or potr, and other instances where one correction leads to a match.)
Note that operators cannot be used as search terms: + - * : ~ ^ ' "
The following anchor types are available in Form Template Editor both for text and barcode.
Selector anchor (optional):
Selector anchors do not have role in form alignment and positioning; they are used only
for selecting the template (whether the template matches the document or not). It is a
template-level operation.
It is not mandatory to define selector anchors; template selection can also be based on
positional and/or reference anchors.
Selector anchors should be used to match templates on pages. You need to find a piece
of text on the page that is specific only to that particular page (in a certain area of
the page).
You can define more than one selectors on the page, if needed or if it increases
confidence.
Positional anchor (optional):
Use these anchor zones to align all fill zones on the page or to select the template.
Since images can get distorted (especially digital camera pictures of documents taken
from a steep angle) using four of such anchors is recommended. It is advised to place
positional anchors close to the four corners of the page. It is a page-level operation.
It is not mandatory to define positional anchors, but otherwise it is useful to define a
reference anchor for every fill zone. Linear distortions, like skews, shifts, zoom-ins
and zoom-outs, can be corrected with positional anchors. Diverse distortions may appear
on the pages to be processed, for example page slips when printing or scanning, or
images taken by digital cameras. In these cases it is recommended to define reference
anchors.
Note Both positional and selector anchors have a built-in tolerance when the
recognized text is matched to the template field text. The tolerance built-in
algorithm is based on the length of the text and on other factors. This means for
example that texts that differ in a single character are not appropriate for a
selector anchor, because it can happen that the CSDK engine accepts the false
rejection of pages when there is a recognition error, as there can always be minor
recognition errors, especially when the texst is short. Hence the longer the text you
can use for a selector anchor and the clearer the text, the better the confidence, for
example several words long upper case texts.
Reference anchor (optional):
Use reference anchors (or reference zones) to more precisely align the fill zones on
the page. It is always preceded by the positional anchor alignment.
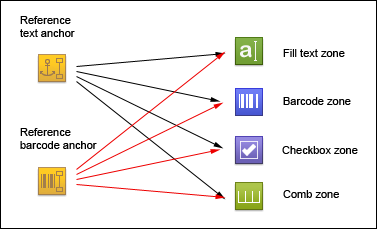
References can be created between a reference anchor and any type of fill zones; the
fill zones can also be of the same type. The purpose of this reference is to define the
relative position of fillable fields to reference anchors.
Figure 1. Zone reference options
It is possible to define a different reference anchor to each and every fill zone. The
position of the fill zone is determined based on the position of the reference anchor
assigned to it. It is not mandatory to define reference anchors. If a zone does not have
reference anchors then it is moved to the position calculated based on the positional
anchors. Reference anchors must be used when we want to define a fill zone whose
position on a page can change, but there is some fixed text on the page in a relatively
same position to the zone. It is recommended to choose the static text positioned before
or above the zone as a reference anchor. Usually, one reference anchor needs to be
defined for one zone.
If the X and Y position of the moving zone can be better defined by two reference
anchors, then after adding the first anchor (Create), the second
one should be linked to the left and right side of the fill zone as well.
If the size of the zone can change (for example height), also two reference anchors are
necessary. The first one should be added to the fill zone by
Create option on the References pane,
the second one should be linked to the bottom of the fill zone. This way the first one
defines the place of the fill zone, while the second one defines the position of its
bottom, or height in this case.
Altogether four anchor zones can be linked to a single fill zone, one to each side,
though it might rarely have any practical use.
If you find that an anchor zone (A1) is not linked to the proper position of the fill
zone, simply re-link it to the proper anchor zone (A2) using the
Left, Top, Right
or Bottom options on the References pane
of the Home tab; This way anchor zone (A1) gets disconnected from
the fill zone. These buttons do not have a toggle function.
Check anchor (optional):
Check anchors are used for checking the form alignment. Check anchors are not used
during template selection and matching. Their positions are determined in the same way,
as that of the fill zones. After positioning, their content is checked and if it does
not match the given content, matching fails.