Extract fields
You can define fields and extract data from document types.
Define the data that is to be extracted from the documents, which in turn creates metadata fields and associated validation for each document type.
- Click the Field Extraction tab.
-
Select
Yes using the toggle
button for
Define Fields and teach the system to
extract data from your document types. Default: No)
The configured document types are displayed below.
-
Click the document for which you want to define the fields.
The preview of the selected document appears in the middle pane as shown below.

-
Lasso the fields you want to extract from the documents using the
mouse.
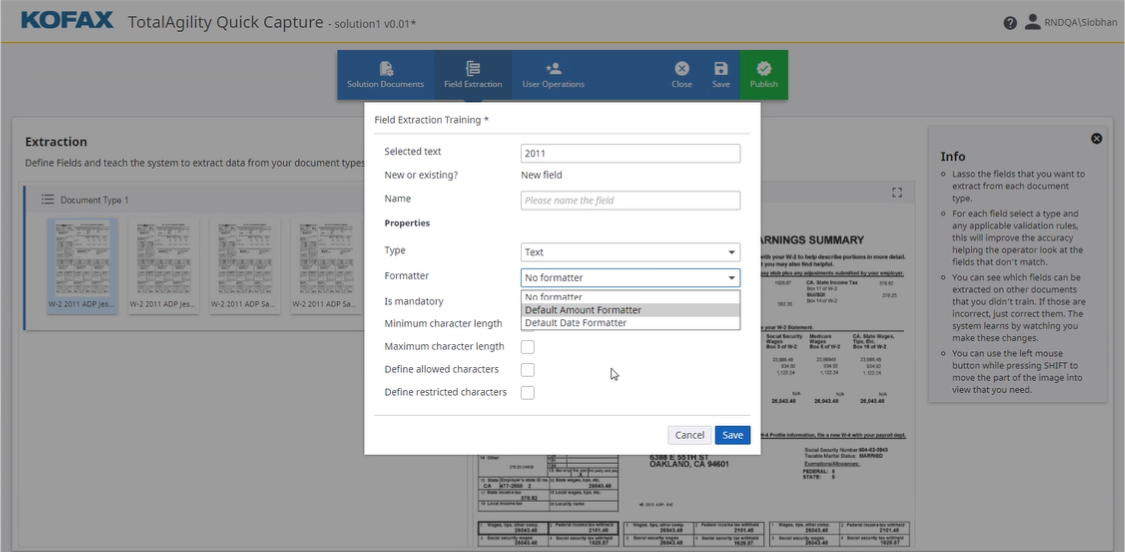
The Field Extraction Training dialog box is displayed and the selected text appears in read-only mode.
-
Configure the field properties.
- Choose whether the field is a New field or an Existing field. If it is an existing field, you can save it and edit it from document types later as needed. If it is a new field configure the following properties.
- Provide a Name for the field.
-
On the
Type list, select one
of the following field types and configure the properties.
Text - On the
Formatter list, select one of the following
formatters to associate with the document type field.
-
No formatter: If selected, it does not take any text, characters or digits from the document for formatting.
-
Default Amount Formatter: Contains the default currency and typical decimal symbol formatting.
-
Default Date Formatter: Contains basic date formatting, such as the date order and date output format. For example, the formatter takes “10/4/20” and formats it as “10.04.2020”. This way, several variation of possible date formats can be normalized into one format. The date formatter can be configured to recognize month names also, so that “April 10th, 2020” can also get converted to “10.04.2020”.
-
-
Define the following validation rules as applicable for the field.
-
Is mandatory: Select this option, if you want the field to be mandatory.
-
Minimum character length: If selected, lets you enter or select the minimum number of characters allowed for the result. If an extracted result is shorter than the minimum length, the field is marked as invalid. (Default: 1)
-
Maximum character length: If selected, lets you enter or select the maximum number of characters allowed for the result. If the extracted result is longer than the maximum length, the field is marked as invalid. (Default: 10)
-
Define allowed characters: If selected, lets you enter the characters that are allowed in the result.
-
Define restricted characters: If selected, lets you enter the restricted characters that are not allowed in the result.
If a field contains characters other than the restricted set, the field is marked invalid and needs review by a validation operator.
-
Date -
On the Formatter list, select No formatter or Default Date Formatter.
-
Is mandatory: Select this option, if you want the field to be mandatory.
-
To use a date as a baseline to compare with the date found on the document, select either option for Reference date:
-
Today: Specifies the date a document is processed.
-
Fixed date: Lets you enter or select a reference date to use.
-
-
Configure the following options as applicable.
-
Period before reference date: If selected, restricts a date found on a document to be past N days before the reference data. If a date falls outside the N day value, it is invalid. (Default: Clear. If selected, default is 0 Days).
-
Period after reference date: If selected, restricts a date on a document to be within N days after the reference date. If a date falls outside this range, it is invalid. It implies that all dates are restricted to be less than or equal to the date the document is processed. (Default: Clear. If selected, default is 0 Days).
-
Number -
On the Formatter list, select No formatter or Default Amount Formatter as needed.
-
Select or clear Is mandatory as needed.
- On the
Formatter list, select one of the following
formatters to associate with the document type field.
- Repeat steps 3 to 5 to extract fields for other documents in your document types.
-
Click
Save.
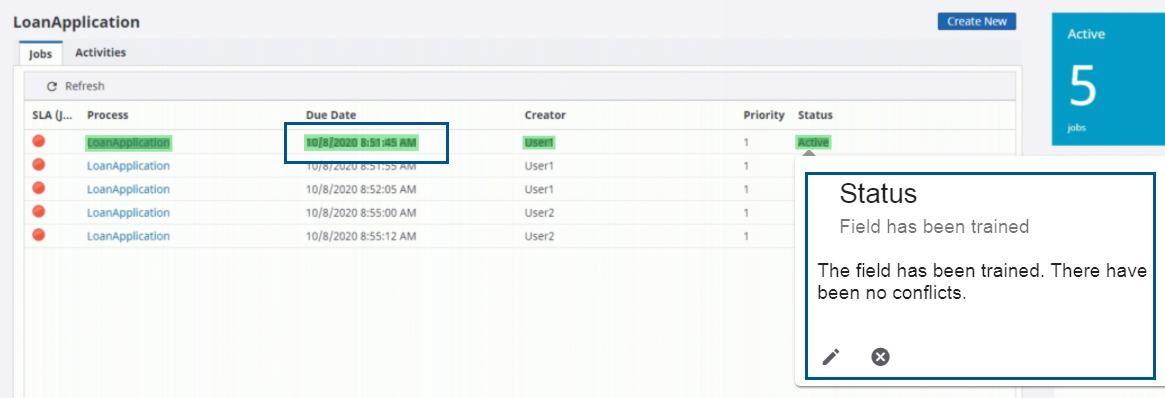
The document type appears in the preview pane displaying the extracted fields in green color as shown below. On hovering your mouse over the field, a message pops up indicating that it has been trained and whether it has any conflicts.

To edit the fields, you can click from here, or click in the document type. Click to cancel the training.
Note-
Configuring the field types and validation rules help the system look at the ones that do not match your rules. You can also check the fields that can be extracted on the documents that are not trained.
-
You should show the system three instances of each field in each document type unless it is already able to find the field on each sample after viewing it only once or twice.
-
Edit a field
You can edit a document type field in one of the following ways:
-
Click on the Status. In the Field Extraction Training dialog box, edit the field as needed.
-
Click for the document type to open the list of selected fields. In the Fields of document type "<Document Type name>" dialog box, select the field to edit, make changes as needed and then click Save.
Click to cancel the training.