Get Started
The following instructions assume that you have downloaded and installed Kofax RPA on one of your computers. See "Quick Start Guide" in the Kofax RPA Installation Guide to start using Kofax RPA.
-
Download the KofaxRPA_DesktopAutomation-11.2.0.0.msi installation file from the Kofax download portal. Make sure your devices meet the requirements listed in "Desktop Automation requirements and prerequisites" in the Kofax RPA Installation Guide.
-
Install and configure the Desktop Automation Service on a remote computer that run the applications you wish to automate. If you only need to automate terminal applications, skip this step.
-
Open Design Studio.
-
Create a Robot.
-
Click .
-
Specify a name for the robot and select a project. Click Finish.
The new robot appears on a new tab in the editor window. As opposed to Basic Engine Robots that are identified by a blue icon
 , Robots are identified by a green icon
 .
Note At this point, you can perform basic editing of the Robot workflow, such as add action steps, configure input values, set variables, and perform other actions that do not involve the use of external, real-time data and applications. To be able to automate external applications and interact with data as well as run a Robot, it needs to be called from a Basic Engine Robot.
.
Note At this point, you can perform basic editing of the Robot workflow, such as add action steps, configure input values, set variables, and perform other actions that do not involve the use of external, real-time data and applications. To be able to automate external applications and interact with data as well as run a Robot, it needs to be called from a Basic Engine Robot.
-
-
Open an existing Basic Engine Robot or create a new one by clicking .
-
To allow execution for the Basic Engine Robot, click Prepare Execution
 on the toolbar or in the
Applications pane.
Important Only one Basic Engine Robot at a time can have the execution privilege, so to take the execution privilege from one robot to another, open the tab with the required robot and click Prepare Execution. Also, while multiple Basic Engine Robots can execute in Debug mode at the same time, only one Basic Engine Robot at a time can have the privilege to execute in Design mode. The robot that has the execution privilege in Design mode can also run in Debug mode at the same time, so you can switch between the two modes.
on the toolbar or in the
Applications pane.
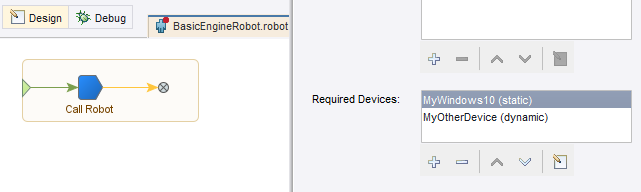
Important Only one Basic Engine Robot at a time can have the execution privilege, so to take the execution privilege from one robot to another, open the tab with the required robot and click Prepare Execution. Also, while multiple Basic Engine Robots can execute in Debug mode at the same time, only one Basic Engine Robot at a time can have the privilege to execute in Design mode. The robot that has the execution privilege in Design mode can also run in Debug mode at the same time, so you can switch between the two modes.When a Basic Engine Robot has the execution privilege, the editor tab of this robot is highlighted. When a Basic Engine Robot is calling a Robot, the tabs of both robots are highlighted for convenience as shown below. The robot where execution is currently located is marked with a red dot.

-
Insert a Call Robot step in the Basic Engine Robot.
-
In the Robot drop-down list for the step, select the Robot created in Step 4.
In the future, you can also create a new Robot from here by clicking Create New in the Robot drop-down list. If you are creating a new Robot after specifying the values and mappings for the Basic Engine Robot, the new robot will inherit these properties.
- Configure input values, output mappings, and required devices. See Reference to Automation Device and Automation Device mapping. If you want to automate terminal applications only, skip the configuration for required devices.
-
-
When the execution is allowed, to start editing the Robot, execute the workflow to the Call Robot step and then click Step Into Robot
 on the toolbar.
The tab with your Robot is opened, and you can now perform full editing and execution of the robot.
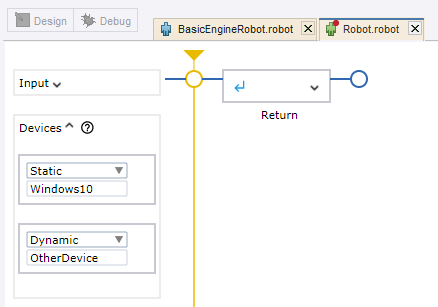
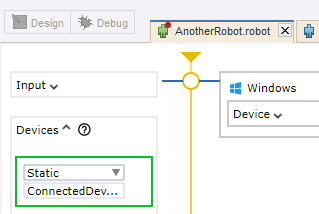
- If you are planning to automate external applications, specify the automation
devices configured in Step 7b in the
Devices box on the left. If you only need to automate terminal applications, skip this step.
-
The number of devices specified in the Basic Engine Robot and the Robot must match.
- The devices names that you set in the Robot may differ from those in the
Basic Engine Robot.
-
A static device in a Robot is a device to which the connection is already established. If a dynamic mapping is specified for a Call Robot step in the Required Devices property of the Basic Engine Robot, and the device has previously been connected to, this dynamic mapping can be passed to a static device. In other words, if the device is previously connected using the dynamic mapping, in the Devices pane in the Robot, you can select to use a static device and reuse the connection established with the dynamic mapping. This is convenient when you need to reuse this Robot in different Basic Engine Robots.

-
-
You can start designing the automation workflow of the Robot. You can also run the workflow to see it in action.
-
Once you finish designing your Robot, you can run it to automate the devices.
-
To step out of the Robot and switch to working on the Basic Engine Robot, execute the entire Robot workflow and then click Step Out
 on the toolbar. In the Basic Engine Robot, the
Call Robot step is now shown as executed.
on the toolbar. In the Basic Engine Robot, the
Call Robot step is now shown as executed.
-
To close the Robot without executing it to the end or returning a result, click Leave Robot
 on the toolbar. In the Basic Engine Robot, the
Call Robot step is now shown as
not executed.
on the toolbar. In the Basic Engine Robot, the
Call Robot step is now shown as
not executed.
-
Convert old Desktop Automation action step
In Kofax RPA versions 10.7.0 and earlier, a standalone Desktop Automation Editor was used to edit the Robot workflow contained in a Desktop Automation action step. Starting with Kofax RPA 11.0.0, you can execute Desktop Automation action steps created in version 10.7.0 or earlier, but to edit the workflow, you need to extract the workflow from the step into a new Robot and change the Desktop Automation step to a Call Robot step referring to the new robot.
The export can be performed with both Basic Engine Robots and snippets containing Desktop Automation steps.
-
To convert the action step to a Robot, in the Projects tree, right-click a Basic Engine Robot containing a Desktop Automation step and click Export Robots. If you open a single robot and select the Desktop Automation step, you can preview the future Robot by clicking Preview in the step properties.
-
For convenience when working with multiple robots, you can export several Robots at once. In the Projects view, right-click any folder or select and right-click multiple Basic Engine Robots containing Desktop Automation steps and then click Export Robots.
A new dialog box appears listing all found Desktop Automation steps to extract from.
-
-
If required, you can assign a new descriptive name to the future Robot, preview the future robot, and see the Desktop Automation step in the containing Basic Engine Robot.
-
Click
 to rename the selected file.
-
Click
 to preview the selected Robot to be created after the export.
-
Click
 to show the selected
Desktop Automation
step in the containing Basic Engine Robot.
to show the selected
Desktop Automation
step in the containing Basic Engine Robot.
Note Changing the zoom level in the Workflow Preview window also affects the zoom level of the Robot editor. -
-
Click Next to select a location for the exported robots inside the current project.
-
Click Finish to close the dialog box and start the export.
An export summary appears listing how many robots and snippets have been exported. Any required devices configured in the Basic Engine Robots automatically appear in the Robots.