Edit Robot
When you work on a Robot, several panes are available. For more information, see the following topics.
- Editor
- Attributes Pane
- Recorder View (also, see application-level actions)
- Search Results
- Comment
- State
- Output Log
- Tips
You can undock and move any of the editor's windows to make editing more convenient.
Editor
Contains a workflow of steps as well as variables, expressions, and tree mode settings. Buttons on the toolbar below the menu help you navigate through the steps of the workflow. You can go forward in the workflow using the Start Execution, Step Into, Step Over, and Step Out buttons; you can also pause or reset the execution of the robot. Use the following key combinations to select several steps:
-
Shift+click: selects a range of steps
-
Ctrl+click: adds/removes selection of steps
-
Ctrl+Shift+click: adds a range selection
Toolbar Buttons
|
Button |
Description |
|---|---|
|
|
Opens a project. |
|
|
Saves changes in the workflow. |
|
|
Reverts the last change. |
|
|
Repeats the reverted action. |
|
|
Copies a selected element or elements of the workflow to the clipboard. For example, several steps or a finder. |
|
|
Cuts selected steps. |
|
|
Pastes the content of the clipboard into the workflow at the selected element. For example, a flow point or a finder. |
|
|
Deletes selected steps. |
|
|
Stops and leaves the Robot without executing it to the end or returning a result. |
|
|
Starts executing the workflow from the current flow point. |
|
|
Pauses automation workflow execution. |
|
|
Executes to the next flow point. In case the next flow point is inside a collapsed step, this step will be expanded. This is essentially related to single stepping case. |
|
|
Executes the step immediately following current flow point. If there is no such a step, it executes to the next flow point. |
|
|
Executes to the flow point immediately following the step containing the current flow point. When the workflow is executed until the end, clicking this button steps out of the Robot. |
|
|
Enabled when the current flow point is inside a Loop step. Press the button to execute until the same flow point is reached again. The loop can be executed more than once if the flow point is skipped in some iterations. If there are no more iterations, the execution stops at the flow point outside the Loop step. |
|
|
Resets the execution of the Robot. |
|
|
Opens a dialog box where you can paste the step location code to go directly to the step or copy the location code of a step. To go directly to a step, open the robot and click the Go to Location button or press Ctrl+G. A dialog box opens where you can paste the code. This can be useful when an error is logged for a particular step, and you can use the step location code from the log to navigate to it in the robot. To copy the location code of a step, in the robot, select the step and click the Go to Location button or press Ctrl+G. A dialog box opens where you can copy the code. This can be useful when you need to share the step location with someone else. |
 Open project
 Save All
 Undo
Undo
 Redo
Redo
 Copy
Copy
 Cut
Cut
 Paste
Paste
 Delete
 Leave Robot
 Start Execution
 Pause
Pause
 Step Into
 Step Over
 Step Out
 Go to Next Iteration
 Reset
Reset
 Go to Location
|
Button |
Description |
|---|---|
|
|
Brings to view the current flow point location. |
|
|
Collapses all steps and other elements in the editor pane. |
|
|
Expands all steps and other elements in the editor pane. |
|
|
Collapses all steps and other elements except the selected ones. |
 Go To Current Flow Point
 Collapse
 Expand
 Collapse all but selection
Newly inserted steps are not executed unless you click Step Into or Step Over on the toolbar.
Zoom in the workflow view
For your convenience, you can zoom in and out in the workflow view the same way you zoom in a web browser.
-
To zoom in: Ctrl+plus sign (+) or Ctrl + mouse wheel scroll up
-
To zoom out: Ctrl+minus sign (-) or Ctrl + mouse wheel scroll down
Attributes Pane
Contains the Robot attributes.
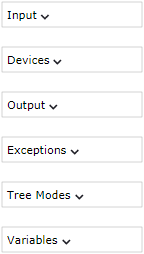
-
Input: Lists inputs that a Robot takes.
-
Devices: Use this element to provide a reference to one or several required devices.
-
Output: Lists outputs that a Robot delivers to the Basic Engine Robot.
-
Exceptions: Lists unhandled exceptions that may be thrown when a Basic Engine Robot is calling.
-
Tree Modes: Use this element to configure the application tree type for different applications to deliver.
-
Variables: Use this element to configure the Robot variables.
Find Usage
For Input, Devices, Variables, and Exceptions, you can use the Find Usage feature to find where they are used. Right-click the required element and click Find Usage.
This feature is similar to the text search with the only difference: the list in the Search Result panel shows instances of a particular element only.
Recorder View
Shows tabs with open application windows and a tree with available elements. You can select elements in the interface or select images and insert steps by right-clicking the selected element or image. The bottom part of the Recorder view shows the coordinates of the mouse relative to the top left corner of the application window as well as the live streaming status of the device state.
When you select an element in the view, along with the window coordinates, it shows the coordinates relative to the top left corner of the selected element as well as the path to the element in the bottom bar.
All tag paths in the Recorder View are interactive. Left-click a tag in the path to make the node a selected tag, right-click a tag to open the context menu for the node.
Tags are marked with colored boxes in accordance with their current state:
-
A green box around a tag: currently selected tag.
-
An orange box around a tag: secondary tag.
-
A blue box around a tag: ternary tag.
To switch between elements of different levels, use Select Outermost Tag, Select Tag One Level In, Select Tag One Level Out, Select Innermost Tag, Select Previous Sibling Node, Select Next Sibling Node buttons.
Zoom in the Recorder View
You can zoom in and out in the Recorder View either by selecting a zoom level in the toolbar or the same way you zoom in a web browser.
-
To zoom in: Ctrl + mouse wheel scroll up
-
To zoom out: Ctrl + mouse wheel scroll down
Toolbar Buttons
|
Button |
Description |
|---|---|
|
|
Pauses or resumes live streaming of the device state. Click to pause or resume streaming in the Recorder view. When streaming is active, the following is shown under the Recorder view:
When streaming is paused, the following is shown under the Recorder view:
|
|
|
Replaces the selected in the editor pane finder with a finder that matches the selection in the Recorder View. |
|
|
Shows the next element that matches the finder. The button's tooltip also provides the number of matched elements. |
|
|
Moves selection to the next node that matches the selection in the Recorder View. |
|
|
Zooms in and out in the Recorder View. |
|
|
Changes selection to the node, which is parent to the selected one. |
|
|
Selects the first child node of the selected one. |
|
|
Changes selection to the top node in the application tree. |
|
|
Selects the last child node of the selected one. |
|
|
Selects the previous node located on the same level in the application tree. |
|
|
Selects the next node located on the same level in the application tree. |
|
|
Copies the subtree element selected in the tree view. |
|
|
Immediately executes and streams newly added action steps. When enabled, the circle on the button is red. Prior to adding a step or a number of steps, click this button. If a step opens a new application or a dialog, a respective tab appears in the stream view and becomes the active tab. To stop automatic execution, click this button again. |


 .
.
 .
.
 Create finder for selection
 Show next location found
 Select Next Node Matching Click
 Select zoom level
 Select Tag One Level Out
 Select Tag One Level In
 Select Outermost Tag
 Select Innermost Tag
 Select Previous Sibling Node
 Select Next Sibling Node
 Copy Sub Tree As XML

Application-level Actions
Application-level actions are actions applied to the entire application and available by right-clicking the application tab in the Recorder View. The list of application-level actions and steps includes the following:
-
Application Action
-
Focus: This action is available for remote desktop applications.
-
For locally running applications, such as Excel, Document Transformation Browser, website browser, and terminal emulators the list of application actions varies. See the related topics for details.
-
Search Results
Shows the overview of the search results. See Search.
Comment
Shows comments for selectable items in the automation workflow, such as steps, Group steps, variables, finders, input types, conditional branches, and so on.
To write or change a comment, click an item and add/change your notes in the Comment window. You can use the Undo and Redo buttons here. The comment is automatically saved when you click outside the window.
An item that contains a comment is marked with a comment sign.
State
Shows the state of the workflow execution, such as variable values. When
Kofax RPA
detects that a binary variable contains an image, the image is displayed in the view.
Kofax RPA
detects GIF, JPEG, BMP, TIFF, and PNG images. The image tooltip shows the MIME type of the image and its size (width and
height).

Output Log
Contains workflow execution messages.
Tips
- Put focus on errors in workflow
- When a step is inserted from a flow point in the Robot, and that step contains an error or multiple errors, the location of the first error is indicated in the expanded step. If the robot execution is stopped due to errors in a step, that step is also expanded to show the location of the first error. If any steps were inserted in the workflow using the "Surround with" type of steps, those steps are expanded, too, for convenience.
- Make instant mouse clicks that are not recorded
-
You can perform an instant mouse click on an element without adding it to the robot workflow. For example, this can be useful to close an unnecessary or accidentally opened tab. To perform this action, right-click an element in the Recorder View, click Unrecorded Instant Click, and select the mouse click type to use.