Create a Data Mapping
- Select the relevant XML element in the source view:
- Configure the mapping using "Extract with XML Data Mapper" on the context menu of the selected XML element.
-
On the Extract list, select
With XML Data Manager.
The XML Data Manager window appears.
- Map a source from the available list.
- In the Target Variable area, select a target variable and type.
-
The bottom right area of the window is reserved for the configuration of details for individual entity mappings.
For more information, see Configuring.
The step sequence that performs the mapping at runtime is automatically generated.
- Click OK.

Selecting Data
While the selection of data is easy, it is important to know how the selection and mapper interact.
-
In the Source column, select an XML element to map entities into variable attributes. Use the mapper to map the
following entities to variable attributes:
-
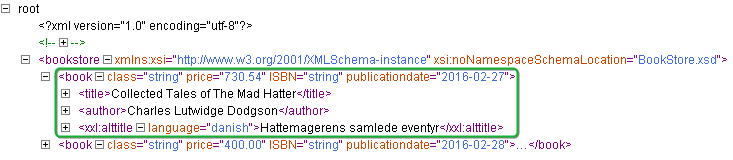
The attributes of the selected element itself. In the Sources column such attributes are listed as plain text names.
-
The contents of sub-elements of the selected element that do not themselves contain sub-elements. In the Source column, such elements appear in an XML-like format where names are enclosed by < and >.
-
The attributes of sub-elements of the selected element that do not themselves contain sub-elements. In the Source column, such attributes also appear in an XML-like format where both the enclosing element names and the attribute names are enclosed by < and >.
Note To activate the mapper for a section, at least one mappable element must be associated with the selected element. -
Configuring
The configuration step is where most of the user interaction takes place. The configuration step is intended to identify an appropriate target variable attribute for each source entity that you wish to map. You are not required to map all available sources.
- In the Target Variable section, select Create a new Variable.
- Enter a name for the variable.
- Select Create a new Type.
-
Enter a type name.
Attribute names matching the source entities are automatically generated and a mapping is suggested.
-
To create a new variable from an existing type, select Use Existing Type. The system attempts to map source entities where the type prescribes attribute names that coincide with the names suggested by the sources.
-
You can use an existing variable and associate it with a new type. Attribute names matching the source entities are automatically generated and mapping is suggested.
-
You can use an existing variable and an existing type. The system will try to map sources automatically based on the attributes in the type.
Note When a new mapping is initiated, the system automatically attempts to make appropriate variable and type choices. Suggestions are made based on the XML element tag name . If a variable has the same name, the variable and type are suggested. If a matching variable exists but a type is named like the tag name, the system suggests creating a new variable using this type. -
- To map Entities, in the Source list, select an entity.
-
In the Target list, select an attribute.
A line connecting the source and the target shows the connection.
You can map a single source to more than one target.
-
If the source entity is required for the overall mapping to be sound, select the check box next to the Source
entity. When a source entity is marked as required, if that field does not exist during extraction, the robot fails.
Associations can be dissolved as easily as they are created. To clear an association, hover the line close to the target and click the red cross that appears.
-
If no target attribute is suitable for the source entity is available, select the source element and click add
 .
.
The Add Attribute window appears.
-
Enter a name and type for the attribute.
To remove an attribute, select the attribute and click remove
 .
Note This only works with attributes added in the current invocation of the mapper, such as attributes that have not yet been persisted in the corresponding type file.
.
Note This only works with attributes added in the current invocation of the mapper, such as attributes that have not yet been persisted in the corresponding type file. -
To configure the target attribute, select the attribute.
Configuration attributes appear.
You can associate data converters with the mapping, such that data may be brought into acceptable form.
You can select Trim Spaces if the source entity is an XML attribute.
-
You can change the target attribute name and type.
-
Associate data converters with the mapping such that data is brought into an acceptable form.
-
Select to clear Trim Spaces for XML attributes.
-
Auto-generating Steps
-
When the configuration of a data mapping is done, click
OK.
The system auto-generates the actual steps required to perform the implied extractions and inserts the steps into the robot. The procedure always generates exactly one extract or extract tag attribute step for each association created in the mapper.

-
Anchor the data mapping by a named tag identifying the original XML element you selected.
If such a named tag does not exist, a Set Named Tag step is generated and inserted into the robot just before the actual data mapping.
Note Sometimes such a Set Named Tag is not necessary because a suitable named tag is already in place. This often occurs when the mapping is part of a loop.