Basic setup options
Basic setup without Robot Lifecycle Management
The following diagram illustrates a basic recommended Kofax RPA setup without Robot Lifecycle Management. This setup consists of two Management Consoles: one for development and one for production.
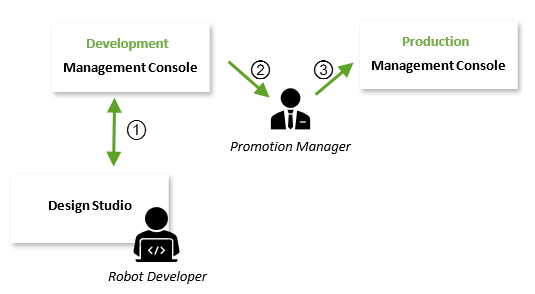
In this example setup, the Robot Developer establishes the synchronization (1) with a project stored in the development Management Console, creates new objects or makes changes to the existing objects, and then synchronizes the project again with that Management Console.
When the Promotion Manager considers a project for production, the manager makes a backup of that project (2) or particular objects from the development Management Console and then uploads the backup (3) to the production Management Console.
Without configuring Robot Lifecycle Management, this setup does not support the following features:
- Accurate version history for each object in a project.
- Ability to know which version is currently in production, to see the author of a change, the date an object was last changed, and a message explaining the changes.
- Ability to promote a specific version of an object from development to production.
- Ability to quickly revert to a previous object version in production.
- Ability to revert breaking changes in the development environment.
To include all of these features for use in your Kofax RPA environment, you can configure a basic setup with Robot Lifecycle Management as shown in the next topic.
Basic setup with Robot Lifecycle Management
The following diagram illustrates a basic recommended Kofax RPA setup with Robot Lifecycle Management. This setup shows two instances of Management Console that share a single repository: one instance for development and one instance for production.
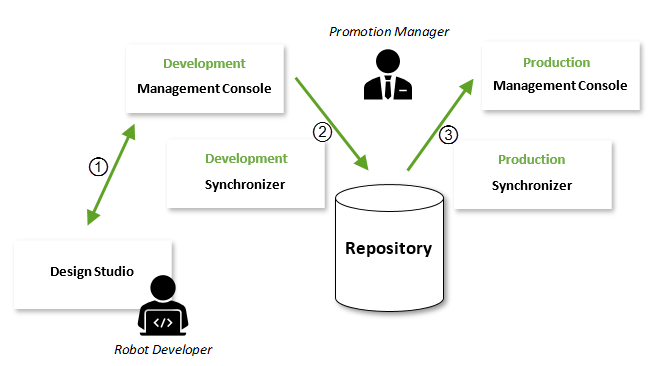
In this example, the Robot Developer establishes synchronization (1) with a project stored in the development Management Console.
Whenever a Robot Developer updates the project in the development Management Console, the changes are automatically synchronized (2) with the shared repository; they are pushed as a change commit on the specified branch. The responsibility of the Production Manager is to point to the branch to use in production.
At this point, two methods to promote the change are possible:
-
Merge, re-base, cherry pick, or pull the changes to the branch specified in the production Management Console.
-
Simply specify the production Management Console to the new version.
When the Promotion Manager approves the changes, the production Synchronizer takes the changes (3) from the repository and then pushes them to the production Management Console.
In the following topics, we will recreate this setup step-by-step.