Get Started with Desktop Automation
The following instructions assume that you have downloaded and installed Kofax RPA on one of your computers. See Quick Start Guide in the Kofax RPA Installation Guide to start using Kofax RPA.
-
Download the Kofax_RPA_DesktopAutomation_10.4.0_x32.msi installation file from the Kofax download portal. Make sure your devices meet the requirements listed in "Desktop Automation requirements and prerequisites" in the Kofax RPA Installation Guide.
-
Install and configure Desktop Automation Service on a remote computer that run the applications you wish to automate. If you only need to automate terminal applications, skip this step.
-
Create a robot in Design Studio.
-
Click .
-
Specify the name of the robot and select a project. Click Next.
-
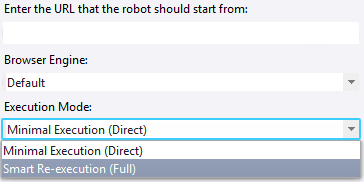
Select Smart Re-execution (Full) in the Execution Mode and specify other options if necessary. Click Finish.
By default, the End step is selected in the created robot.
-
-
Insert an action step.
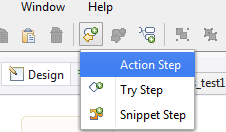
Click Select an Action on the Action tab and choose Desktop Automation.
- Configure input values, output mappings, and required devices on the Action tab of the step. See Automation Device mapping and Reference to Automation Device. If you want only to automate terminal applications, skip the configuration for required devices.
- Click
Edit in the
Desktop Automation
step to open the
Desktop Automation Editor
for creating and editing the
Desktop Automation
Workflow.

In this editor, you can design your automation workflow. You can also run the workflow to see it in action.

- Once you finish designing your robot, you can deploy it and run to automate the devices.