Open Document Transformation Browser Step
The Open Document Transformation Browser step helps you extract and use information from images and PDF documents. The Kofax RPA Document Transformation Service can process .tif, .png, and .pdf files.
Properties
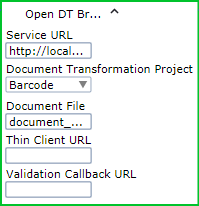
- Service URL
- Specify a URL and a port if necessary for the computer running Document Transformation Service. If the service is installed locally, enter localhost in this field. The URL must include the http:// or https:// prefix. If you use https, the web hosting service should have a certificate accepted by well-known certificate authorities.
- Document Transformation Project
- Select a project to process your documents. You can use the built-in projects or select Customized. For a Customized project, specify the path to the project to process your documents in the Project Name property, such as c:\rpa\ocr. The project link must be a locally accessible folder on the Document Transformation host and not on a computer running Design Studio.
- Document File
- Enter the path to the document to process. Use either a full path to the graphical document or a PDF file accessible form the computer running a robot, or specify a binary variable that contains a document.
- Thin Client URL
- Specify a URL for the thin client service. This property is required to send processed documents for validation. The
URL is specified in the
ValidationService property of the
Document Transformation Service. The URL may look similar to the following:
http://localhost:8082
- Validation Callback URL
- Specify a REST Robot URL for the thin client service to call after a document is validated. When validation is
complete, this URL is used to start a robot by the
Management Console. The URL must include the
Management Console
address along with a path to the robot to run. The URL may look similar to the following:
http://localhost:8080/ManagementConsole/rest/run/Default project/binaryInputAndWait.robot
You can find a valid callback URL in the Management Console by clicking the REST button for the given robot. Such a robot should have an input variable called document with an attribute doc of type binary. When the robot is called, the doc attribute of the document contains the transformed and validated document. If the Management Console needs credentials for login, they can be provided in the URL as follows:
http://user:password@localhost:8080/ManagementConsole/rest/run/Default project/binaryInputAndWait.robot
See REST under Execute Robots for more information.
DT browser
The DT (Document Transformation) browser shows transformation results and helps you work with extracted data in the document. The following table explains the DT browser toolbar elements.

|
Button |
Description |
|---|---|
|
|
Navigates one page back in a multi-page document. |
|
|
Navigates one page forward in a multi-page document. |
|
|
Navigates to the specified page in a multi-page document. |
|
|
Sends a document for manual validation to the specified Document Transformation Thin Client server. |
|
|
Status of the transformed document with error description if any. |


Document Transformation workflow
The Open DT Browser step processes your graphical or PDF documents using a selected project. A project is a module that processes and transforms your documents using OCR and other specified operations.
The processing result is returned to the Desktop Automation editor and opened in the Document Transformation Browser in the Recorder view. The service forms an element tree with all extracted information. Note that in a multi-page document, you can browse through the pages using the Previous and Next buttons on the DT browser toolbar. See DT browser for details.
Elements in the tree contain confidence levels for the OCR results and other extraction results defined by the project. The confidence attribute can contain values from zero to one where the most confident is one.

Derived attributes such as der_x help you find the element and can be used in finders.
Once the transformed document is in the editor, you can determine whether you want to perform the validation of the transformation results. If you are satisfied with the transformation results without any validation, you can extract and use the data in the document.
Validation is performed by the
Document Transformation
Thin Client. Click
 in the
Document Transformation Browser
to send the document to the specified Thin Client. A unique URL is generated and returned to the robot. The robot extracts
the URL and uses it to send the document to a validation user, such as via email. The validation user clicks the URL, enters
credentials, and after that the document with the extracted data opens. The validation user inspects the transformed document and,
if needed, modifies extracted information in the document. When validation is finished, the validation user marks the document as
valid. When the document is marked valid, it is used as an argument for a robot specified in the Validation Callback URL in the
Open DT Browser step.
in the
Document Transformation Browser
to send the document to the specified Thin Client. A unique URL is generated and returned to the robot. The robot extracts
the URL and uses it to send the document to a validation user, such as via email. The validation user clicks the URL, enters
credentials, and after that the document with the extracted data opens. The validation user inspects the transformed document and,
if needed, modifies extracted information in the document. When validation is finished, the validation user marks the document as
valid. When the document is marked valid, it is used as an argument for a robot specified in the Validation Callback URL in the
Open DT Browser step.
Built-in projects
You can edit transformation projects supplied with Kofax RPM and your custom projects in the KTT Project Builder installed by Kofax RPA. Once you open the Project Builder you can access its documentation.
- Barcode project
- The purpose of this project is to extract all barcodes from the document.
To change the Barcode project settings, perform the following steps.
-
Locate the Kapow_Barcodes.fpr project file.
-
Open it in Project Builder.
-
Select the class Default in the Project tree on the left side.
-
Click the eye symbol to open the details.
-
Under Locators, double-click the BL barcode locator. By default the locator is configured to Auto-detect the barcode type.
-
Clear the Auto detect option under Type and select a specific type.
-
By default the locator is configured to automatically detect the orientation. Clear the Auto detect option under Orientation and select a specific orientation.
-
By default the locator is configured to look for barcodes on all pages of a document. To limit the barcode detection to a specific set of pages, select the Regions tab and modify the Enable locator for settings accordingly.
-
When you finish editing the project, close all dialog boxes and click Save Project on the Project tab.
-
- Invoice project
-
This project is designed to extract invoices from the USA and it also supports sales tax. The project requires setup of ERP master data to extract the vendor properly. The master data for vendors and internal companies needs to be provided as a csv file. The project contains a vendors.csv file and an internal_venders.csv file that can be adapted to the company-specific vendors.
To provide and configure master data, perform the following steps.
- Prerequisites
-
-
The vendors file is a semicolon-separated document called Vendors.csv. The file must have the following columns:
-
VendorID (required)
-
CompanyCode (optional)
-
Name (required)
-
Street (required)
-
City (required)
-
ZIP (required)
-
PostBox (optional)
-
Country (required, 2-character country code)
-
FIDNumber (optional)
-
Phone (optional)
-
Fax (optional)
-
URL (optional)
-
Email (optional)
-
-
The internal vendors file must be called Vendors_Internal.csv. It is a semicolon-separated file with the same columns as Vendors.csv. Internal vendors are those that are internal within the customer's enterprise. This file is used to exclude those from the vendor results, as they are easy to confuse with the bill-to address on any normal external invoice.
-
-
Locate the Kapow_Invoices_SalesTax.fpr project file and open it in Project Builder.
-
Open Project Settings.
-
Select the Databases tab.
Note that the 2 Fuzzy Database items are flagged as red, because the path is incorrect.
-
Double-click Vendors.
-
Select the path to the Vendors.csv on the network share.
-
Click OK to close the dialog box. The file is imported.
-
Double-Click Vendors_Internal.
-
Select the path to the Vendors_Internal.csv on the network share.
-
Click OK to close the dialog box. The file is imported.
-
When you finish editing the files, close all dialog boxes and click Save Project on the Project tab.
- Languages project
- The purpose of this project is to identify the language a document is written in.
This project is not configurable.
- OCR project
-
The purpose of this project is to return full text OCR results for the document. Note that this project does not include the validation process by default.
To change the OCR recognition language from the default (English), perform the following steps.
- Locate the Kapow_OCR.fpr project file.
- Open it in Project Builder.
- Click Project Settings.
- In the Project Settings dialog box, select the Recognition tab.
- Select the FineReader page profile.
- Check the desired language.
- Close all dialog boxes and click Save Project on the Project tab.
- US Address Extraction Project
- The purpose of this project is to extract all US addresses from a document.
This project is not configurable.
- Customized
- When you select this option, specify the path to the project to process your documents in the Project Name property, such as c:\rpa\ocr. The project link must be a locally accessible folder on the Document Transformation host and not on a computer running Design Studio.