General Editing
This topic gives a few general hints related to editing Basic Engine Robots in Design Studio. These hints apply to when you make changes to a robot in the Robot view, to a type in the Type Editor or to a text in the Text Editor. For your convenience, you may also use keyboard shortcuts while working in Design Studio.
- Copy, Paste, or Cut
-
Use keyboard shortcuts to cut, copy, and paste items In Design Studio.
-
Ctrl-C Copy
-
Ctrl-V Paste
-
Ctrl-X Cut
In addition, in most lists, such as the list of finders for a step, you can use Ctrl-Shift-C to copy all items in the list.
-
- Group and ungroup steps
-
To group steps, select multiple steps and click Group
 on the toolbar. You can also right-click a step and select from the list.
Some selections cannot be grouped. A group step must have exactly one ingoing connection and exactly one outgoing connection, and this must also hold for the selection of steps that you want to group. The only exception is when a selection of steps does not have any outgoing connection. In this case, you can group the selection, but the topmost End step must be connected to the end of the group. Take a look at the following example.

In this robot, the following are examples of steps you can group:
- All the steps.
- Any single action step alone, such as Step A, Step B, and so on.
- The branch point, step B, step C and the end step after step C.
The following are some examples of steps you cannot group:
- the branch point and Step B (more than one ingoing connection)
- steps B, C, D and the two End steps (more than one outgoing connection)
You can add a step to the created group step by either dragging it into the created group step or by using the copy (cut) and paste option.
To ungroup a step or collection of steps, perform one of the following actions: either drag it out of the group step or collapse the group step, click on the collapsed group step and then click the Ungroup button on the toolbar (or select "Ungroup" in the context menu).
-
Drag a step out of the group step.
-
Collapse the group step, select it, and click the
 Ungroup button on the toolbar.
-
Collapse the group step, right-click it, and select
Ungroup in the context menu.
The Group and Ungroup actions are inverse. If you group a selection of steps and immediately ungroup them again, the structure of the robot is unchanged.
Use expand
 and collapse
 from the toolbar to perform the action on
all groups.
from the toolbar to perform the action on
all groups.
Use expand
and collapse
from the context menu to perform the action
on the selected group or groups.
The Expand and Collapse options on the context menu on steps do the same, but they are restricted to the Group steps in the selection.
- Drag and drop
-
In addition to actions, you can edit robot elements directly using drag and drop. As soon as you drag a step, special indicators appear showing valid drop locations. You can also select and move multiple steps at one time.
-
To move a connection endpoint, select the connection and move the mouse to one of the handles at the end. Next, click the handle and move it to a new location. As soon as you click a handle, special indicators appear, showing where you may connect it.
-
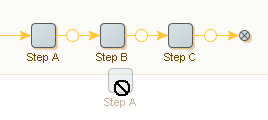
To abort a drag and drop action, move the mouse outside the robot and let go of the mouse button as shown in the following figure.
You cannot drag and drop robot elements with multiple branches.
-
- Add a new connection
-
You can also create new connections using the mouse. Place the cursor near the end of a step so that an indicator appears (an orange circle with a green halo). Click the indicator and a new arrow appears. Keep the left mouse button pressed; move the mouse and a new connection will follow your mouse when you move it. New indicators appear and you can move the mouse to drop the new connection end point by releasing the left mouse button.
- Undo and redo changes
-
While editing a robot, you can undo and redo every action. Click
 or select Ctrl-Z to undo an action. Similarly, click
 or select Ctrl-Y to redo an action.
- Step validation
-
As you edit your robot, the Robot View validates each step. Invalid steps are underlined in red. You can move the mouse to an invalid step to view an explanation of error.
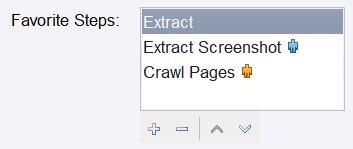
- Add favorite steps to the Insert Step menu
- While editing a robot, you might use some steps more than others. To minimize the time needed to insert your favorite
steps, you can add them directly to the
Insert Step menu. To add steps to the
Insert Step menu, open the
Robot Editor
tab in the
Design Studio Settings
dialog box. To add steps to the list, click
.png) under
Favorite Steps and select steps. To remove steps from the list, select one or
more steps and click
under
Favorite Steps and select steps. To remove steps from the list, select one or
more steps and click
 . To reorder steps, select a step and move it up and
down the list using arrows.
. To reorder steps, select a step and move it up and
down the list using arrows.
Names of steps that work only with a particular browser engine are followed by a robot icon. Steps that work only with the WebKit-based browser have an orange icon, and steps that work only with the classic engine browser have a blue icon. Steps without icons can work with both browsers.