Configure Variables
When creating a new robot, you usually start by configuring its variables. Of course, you can reconfigure the variables at any time during the robot's lifetime, such as changing the initial value of a variable.
-
In the Robot Editor, below the Step View, select
Variables View.
The variables you specify become part of the robot state given as input to the first step of the robot.
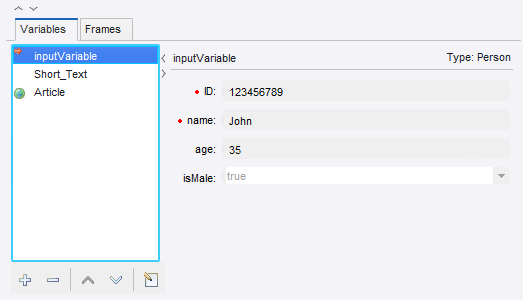
The Variables View shows a list of variables, together with details on the selection. The icon next to the variable indicates the variable type as follows:
-
Input Variable

-
Global Variable

The following Variables view contains three variables: one input variable, one normal variable, and one global variable.

The Variables View shows the values of the variables at the current step. Because these values result from the execution of the robot, you cannot change them directly. However, you can add or remove variables.
-
-
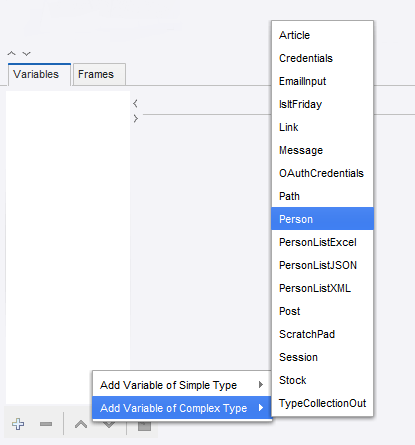
To add a new variable, click
Add
 , or right-click the Variable and select a type.

The Edit Variable window appears.
Note If the variable is added using the right-click method, where a type is already selected, the window opens with the pre-selected type.Note This is also the window used to configure an existing variable, either by double-clicking it or by clicking the button.
-
In the Edit Variable window, enter a name for the variable.
The name must adhere to naming standards. For example, spaces are not allowed. When you click OK, you are notified if the name is invalid. Change an invalid name or click Cancel.
Note Use the variable configuration window to edit initial values. In other words, this dialog box does not, as the Variables view, show current values. The values you provide are used at the start of the execution. -
Select a variable type.
See Variables and Types for more information about types and their connection to variables.
-
Complete the input fields based on the type.
Use these fields to provide the variable with initial values. You do not have to manually give the variable a name.
-
Click
OK.
If you have not entered a name, you are prompted to generate a name from the type name.
-
Use the
Global and
Use as Input check boxes to configure a variable as input to the robot or
global.
If a variable is used as input, it makes it possible to supply the robot with values for that variable when running it on a RoboServer. For input variables, the values entered for attributes should be regarded as test input and used only when you are working with the robot in Design Studio. When the robot is run on RoboServer, the input values are overridden (replaced) by values supplied by the client that runs the robot. Note that variables of simple types cannot be used as input, as their usage is as temporary variables, which are internal to the robot.
-
If you want the variable to keep its value during the entire robot execution, select
Global.
Global variables provide a way to create counters and do other kinds of computation across iterations and branches. Global variables can also be used for accumulation of data across iterations or branches, such as accumulating a text consisting of comma-separated values.
This is different from normal variables, whose values are not kept across loop iterations and branches.
Note In Design Studio, the values of the global variables depend on which steps you have executed to get to the current step. Unless care is taken to execute the right sequence of steps, the values are different from when the robot is actually executed. -
To remove a variable, right-click the variable and select
Remove.
Alternatively, select a variable and click Delete
 below the list.
