Zones and the Document Viewer (zone mode)
Zones can be viewed, edited, and removed using the Document Viewer (zone mode) window. A document can contain one or more zones, and each zone can be configured for a specific purpose. Once you add zones either automatically or manually to the reference document, you can test results on any of your sample documents.
You can press and hold the Ctrl key and click to select multiple zones. Alternatively, you can lasso several zones with your mouse or press Ctrl + A to select all zones. Press Ctrl + click to deselect a selected zone. Once your zones are selected you can delete or move the selected zones.
There are three different types of zones that can be manually added to a document.
-
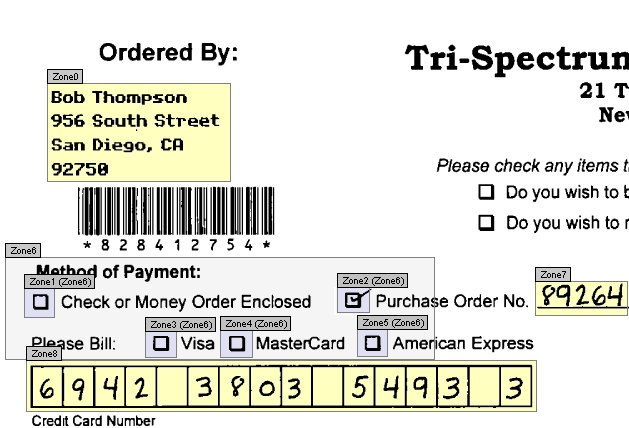
A Text Zone
 extracts handwritten and machine printed text from a document. The text can have multiple lines like a postal
address (Zone0 in the above example), single lines like a purchase order number (Zone7), or be contained in boxes like a credit
card number (Zone8).
-
An OMR Zone (Optical Mark Recognition)
 checks for check boxes, also known as mark grids, and determines whether an option is selected. This zone is
used with other OMR zones, such as Zones 1 through 5 and with an OMR group zone when a document contains a single field with
multiple check boxes.
-
An OMR Group Zone
 groups several OMR zones together, such as a “Method of payment” field (Zone6).
For example, a zone can be used to extract an address that is machine printed while another extracts the value from a group of check boxes. The following image shows examples of zones and different content.
