Define a process
Use this procedure to create a process definition.
- On the Documents Tree, right-click Processes and select New Process.
-
Assign a name to the process and click
OK.
The process screen displays as an empty grid.
- Right-click anywhere on the grid and select Add step or you can also generate several steps simultaneously.
- In the Define Process Step window, on the Definition tab, assign a name to the new step.
- Assign the step a sequence number in the swimlane, and define how the step will function within the overall process. You can also add a custom icon for the step.
-
Click the
Mapping tab.
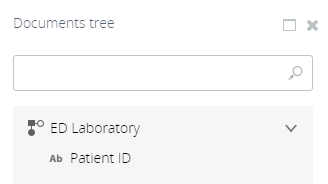
- Click the ellipsis icon next to the record field to open the Documents Tree listing all available records.
-
Select the record to use and click
OK.
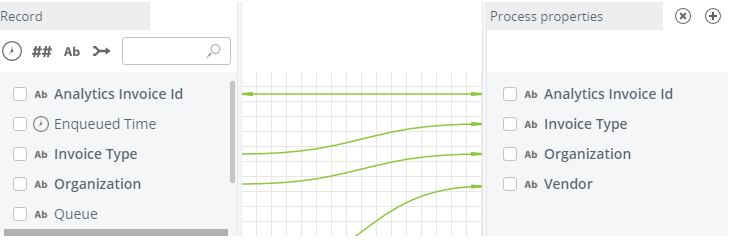
All fields in the selected record are populated in the left record column.
-
Select fields from the record by selecting the box next to the
fields to use. Click and drag these fields to the
Process Properties column to map them as
process properties.
You see the record’s fields on the left, and on the right you see the ProcessID fields and any custom process fields you create. If other fields exist in the record you want to use in the process, such as for a dimension, create a process property (it appears on the list on the right) and map the record field to the process property.
The direction of the link from the record field to the process property is significant. If the arrow goes to the right, you want to take the record field and put its value into the process property. The start node maps a process ID field from a record to the process property on the right with an arrow going to the right, to establish the record’s ProcessID field.
Additional nodes after the start node make a link from the right to the left. Check the existing process ID against the value in a record field to see if that record has the right process ID to be a part of that process instance.
The data types of the record field and the process property should be the same. The default ProcessID is a string. If your process identifier is not a string field, create a new process property that is the same data type as your ID field and use that as the process ID. In the first node of your process, map an ID field to that new process property to use as a process ID. In all other steps, you map from the process ID property to the record field, an arrow to the left.
If the connection is bi-directional, Insight tries to find an existing process instance with the given identifier. If such an instance is not found, the new process instance is created and the value of the record field is set as the identifier.
-
Click
OK when you finish
creating the process step.
Your Step 1 Start Node is visible on the main grid.
-
Repeat the preceding steps to add new nodes to your process.
-
To connect nodes to one another to create process step flows, click a node. Four green dots appear around the edges of the node.
-
To create a connection, click any of the four dots and drag it onto another node’s dots.
-
Generate multiple steps for a process
Very often all steps in a process are based on the same record and use the same definition and field mapping. In this case we recommend to create all steps simultaneously to avoid adding them one-by-one as described above.
-
Right-click anywhere on the grid and select
Generate steps.
The Define process step window appears with the Mapping tab.
- Click the ellipsis icon next to the record field to open the Documents Tree listing all available records and select the record.
-
To identify a step, besides the record you also need to define
either a time field or value for the Step field. Select the time field from the
list which includes all time fields of the record. You can also select the
field for the Step ID (for example, ActivityName or StepID) and select one or
multiple values for each field.
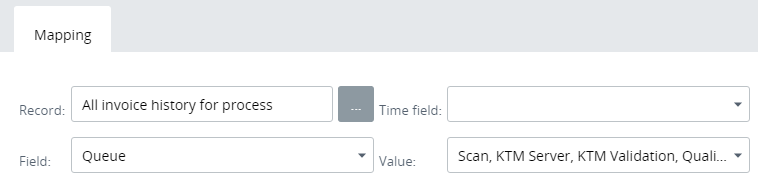
Note You can also type a direct value (for example, Scan) in the value field even if this value is not present in the record or translation table.You can select the step field without a translation table. In this case, all values from the corresponding record are listed in the drop-down list. -
Map the data in the same way as described for creating a
single step.
-
Click
OK.
All steps with the same settings (except for the field value or time field) are generated automatically. If the steps are generated for multiple time fields, the default step names will be these time fields, and if the steps are generated for different step values, the default step names will be these values. Steps with multiple time fields and multiple values cannot be generated simultaneously. In this case you are prompted with a warning message.Note You cannot generate several steps simultaneously for different time fields and different field values. In this case you are prompted with a warning message.
- If required, you can modify each step manually by right-clicking the step and selecting Edit: you can change the step name, swimlane index, style, reorder steps, and more.
- If the process is based on two or more records, repeat above steps for each record.
Link two processes
You can link two processes to filter a process component built on one process by another process component built on a different process. Also, in a process filter definition based on one process you can use a process filter definition based on the linked process.
You can link processes by any process property.
- On the Define Process Step window, open the Mapping tab and select the property by which to join the processes. For example, PatientID.
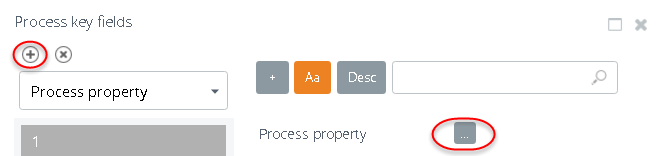
- On the Property Panel, Process key fields and click the ellipsis button.
-
Click the plus icon and then on the right Property Panel click
the ellipsis button.
-
Select the process for joining and the process property by
which to join processes.
The processes are joined now.