Configure the Equitrac Application
After installation, you can configure the embedded application settings.
CAUTION:
The application is fully configured by the installer during
installation. These instructions should only be carried out if reconfiguration becomes
necessary at a later time.
- From a web browser, open the Lexmark MFP device web page: http://device_ip.
-
Click Settings. Depending upon your device series, go to the
Equitrac configuration settings:
- For eSF 6.x devices, go to
- For eSF 4.x devices, go to
- For eSF 3.x devices, go to
- For eSF 2.x devices, go to
-
Click Configure. The EQLogin configuration screen
displays:
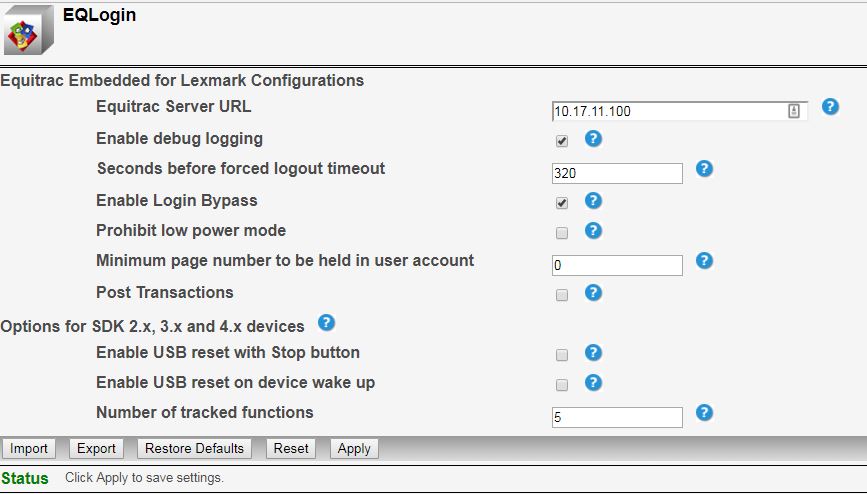
- In the Equitrac Server URL field, enter the IP address or DNS name of the Equitrac DCE server.
- Select the Enable debug logging check box to enable debug logging on the device. If you change this setting, click Apply.
- The Seconds before forced logout timeout field contains the length of time before you are logged out due to user inactivity. User inactivity measures the length of time a user does not interact with the MFP during a session, or if the MFP runs out of paper or a paper jam occurs. The default value is 320 seconds. It is recommended that you keep this setting at a higher number.
- Select the Enable Login Bypass check box if you want to permit users to access functions not protected by a security template without prompting for billing code.
- Select the Prohibit low power mode check box to prevent the device from entering low power or deep sleep modes, then click Apply. Selecting this option prevents the device from using modes designed to conserve power and lessen the effects of normal wear and aging.
- Enter a Minimum page number to be held in user account value, then click Apply. This value is used to synchronize the Equitrac Copy Stop feature with the timing of the device. This value represents the number of pages released from the device after the Equitrac software forces copying to stop.
- Select the Post Transactions check box if the transaction queue is refused by the server. For detailed information about this step, see Transaction Blockage.
-
Under Options for SDK 2.x, 3.x and 4.x devices:
- Select the Enable USB reset with Stop button check box to allow Equitrac software to reinitialize the card reader USB port when the user presses Stop (the cancel/job stop button), then click Apply.
- Select the Enable USB reset on device wake up check box to allow Equitrac software to reinitialize the card reader USB port when the device wakes from sleep mode, then click Apply.
-
Enter the number of device functions tracked by Equitrac Embedded through a
security template in the Number of tracked functions
field.
If you increase the number of billable functions you must manually configure additional security templates, and manually assign these new templates to device functions.